I wanted to gift some bitcoin to a friend, and came up with a fun idea of
writing them a poem with words making up an BIP-39 mnemonic word list.
Then they can easily type in the 12 words in Electrum and take control
of their wallet (and maybe transfer the amount to a wallet I don't have
access to :).
BIP-39 Fundamentals
Basic idea of BIP 39 is that there is a wordlist of 2048 words, so each word
choice encodes 11 bits (2^11 = 2048) of entropy. With 12 words, you have
12*11=132 bits, enough for 128 bits of of true entropy and a 4 bit checksum.
You can read all about it in the
BIP-39
itself.
Now only problem is, that the last word is not random, but must match
the top 4 bits of SHA256 checksum of the preceding 128 bits. So essentially
you can choose the 11 first words, and then try to see which choices of
12th word end up with a valid word list mnemonic.
One could manually type stuff into Electrum word list box, but trying 2048
options sounds pretty frustrating (on average, every 16th try will work).
So let's do it in Python!
Validating a BIP-39 word list in Python
First, grab the English wordlist — and yes BIP-39 is not the best way as it depends on the word list, but it is standard enough. Then we read
it in with Python:
import hashlib, binascii, sysnums = {}wordlist = []with open('english.txt') as fin: i = 0 for word in fin: nums[word.strip()] = i wordlist.append(word.strip()) i += 1
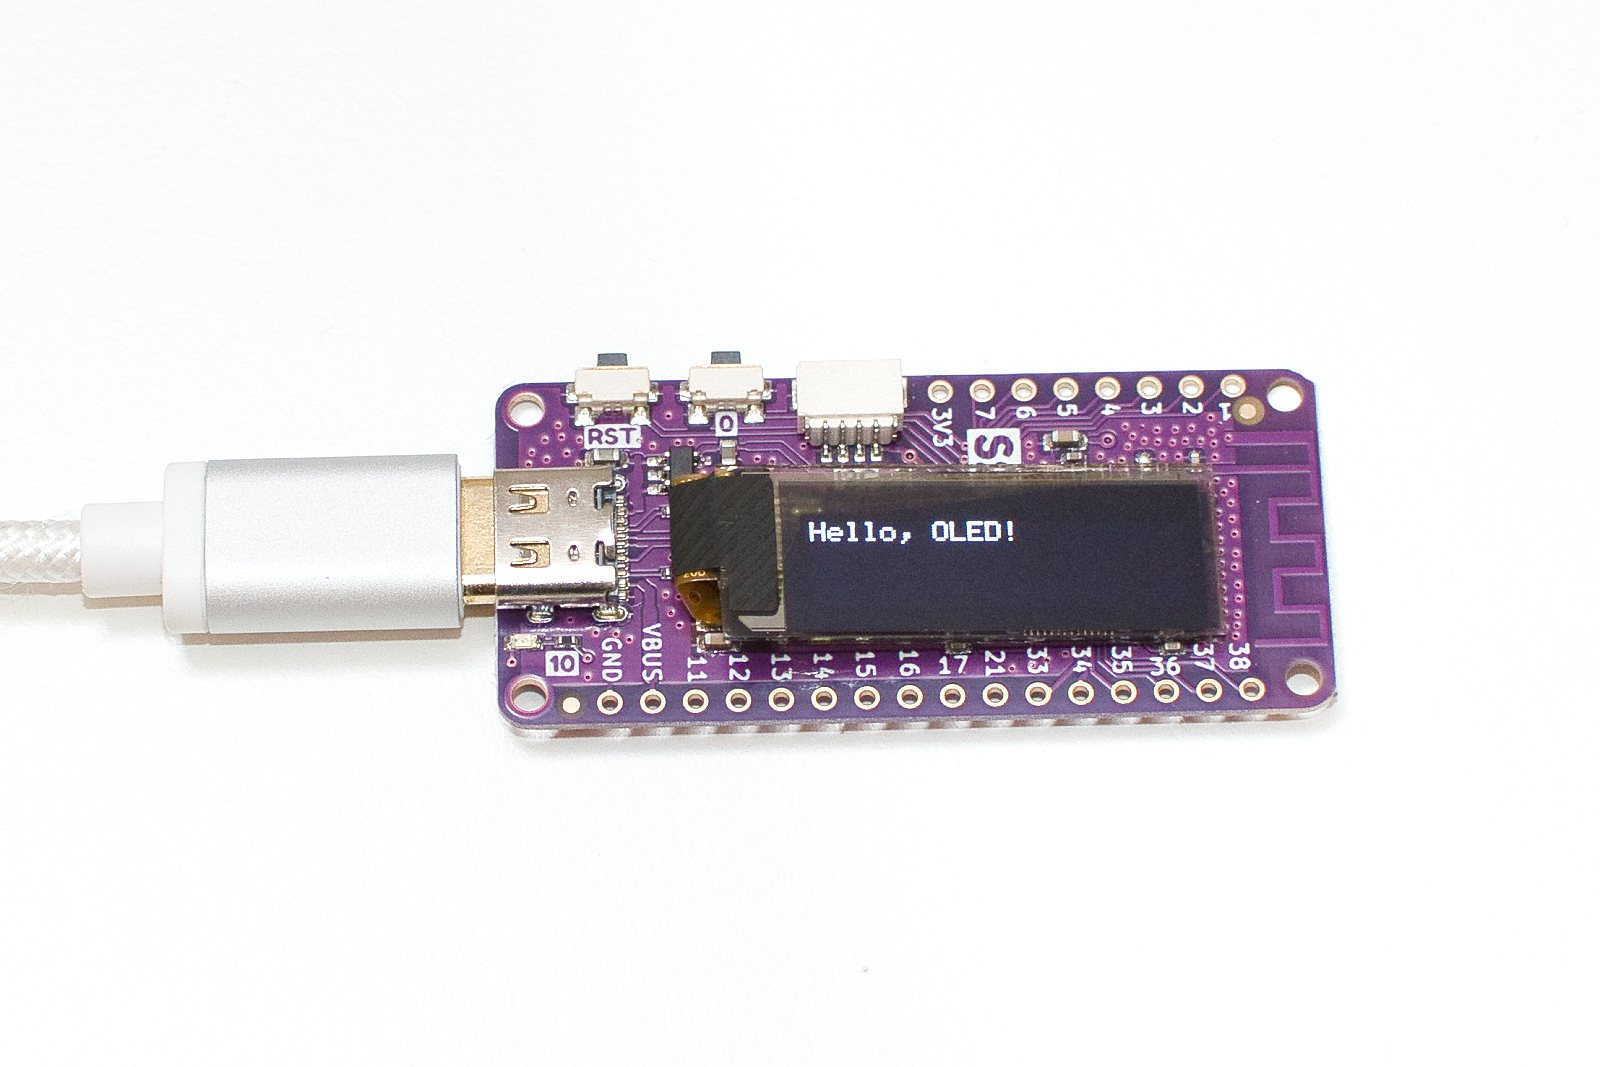
Just a quick note after yesterday's S2 Pico OLED
tutorial.
I encountered some hiccups getting Serial.println() to work on Arduino with
this board. Essentially nothing would come out of Serial Monitor after reprogramming.
I think the core of the issue is that the ESP32-S2 has native USB.
ESP8266 and older ESP32 boards used a USB serial converter chip, so programming
over serial vs. printing to serial happened without any glitches to the USB. Now
with native USB I think here's what happens:
You press Button 0, cycle Reset and release B0
ESP32-S2 boots into "programming mode" and initializes native USB as COM port
You hear the USB connection sound as COM port is assigned
Arduino reprograms the flash
You manually press reset
USB COM port actually drops at this point
When you have Serial.begin(); in your code, it now initializes native USB as
COM port again
You hear the "USB chime" again from your computer, and COM port is assigned
Now if you're used to having Arduino Serial monitor open all the time, the
same COM13 that was there during programming on my PC is now a "new" COM13.
It seems the serial monitor doesn't notice the change. Solution is simple:
Reprogram your chip.
Reset, wait for the "chime"
Only now open the serial monitor
The irksome thing is, that I'll now need a delay in setup() to see what's
going on. Maybe I have an old version of Arduino or something. If you
know another solution, you're welcome to drop me a line (me at codeandlife.com)
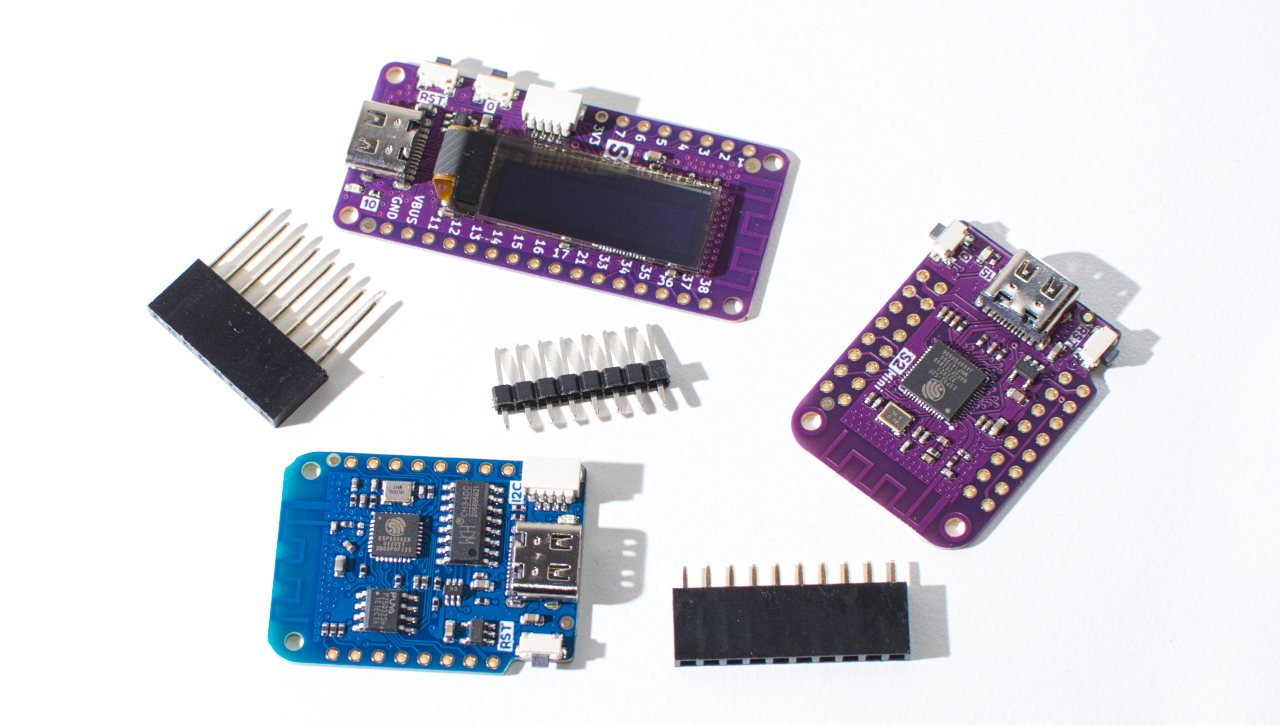
Just received the Wemos S2 pico board from AliExpress, and thought I'd write
a simple tutorial on how to use it with Arduino, as Wemos' Getting started guide was a bit
outdated on Arduino config and did not have an OLED example.
Quick Background
I've been planning to make a DIY hardware Bitcoin wallet just for fun. To make
it even remotely secure — once you assume attackers have your internet
connected devices pwned it pretty much varying degrees of tinfoil — it's
essential that you have an external display and a button to print out your
secret key or which address you're signing your coins to go.
My ESP8266 supply was running low (have been using ), and not sure if it has
enough memory, I looked what Wemos might have nowadays, since I've
used their nice D1 Mini in several projects, such as the ATX power
control. I was very happy to
discover they had this
Wemos S2 Pico
available at a reasonable 8 € price point from LoLin AliExpress store , having an SSD-1306 compatible
OLED display and even a button. Perfect!
Note: there are clones for Wemos products for cheaper, but I
like to show my support even if it costs a dollar or two more!
Setting up Arduino for ESP32-S2 Support
Following Wemos' Getting Started tutorial, I realized the Boards list did not
include any ESP32-S2 modules. I checked that I had the "latest" 1.0.6 version
installed. After some googling lead me to this Adafruit
page,
I realised that I needed 2.0.x version that is served from a different location
(latest ESP32 branch now lives in
Github).
After following the installation
instructions
— essentially replacing the old Espressif "Additional Boards Manager URL"
in Arduino Preferences with the new one — I updated the ESP32 package to
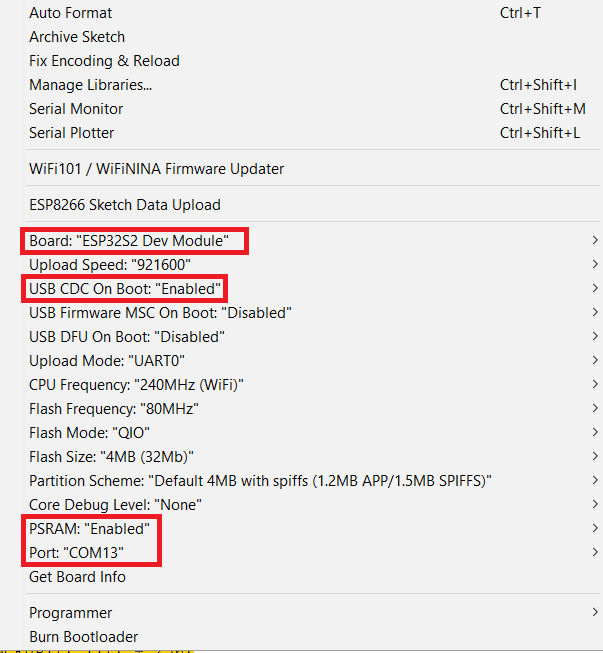
2.0.1 and voilà: There is now the "ESP32S2 Dev Module" available in the ESP32
Boards section. Since Wemos' instructions, the USB CDC setting had changed a
bit, this is how I set it up (changes made highlighted):
Note that the S2 Pico requires you to hold Button 0 down, press Reset button
and release the Button 0 to enter flashing mode. This will change the COM port!
Thankfully, it seems to stay in that mode so you should not be in a rush to
flash.
This post outlines the basics of creating a project that combines Go (or "golang" as googling for "go" is a pain — why didn't the guys at Google think of this?) native backend serving a web UI / GUI running on SvelteKit.
In a nutshell, this involves creating a new go project, creating a simple web server program that supports serving files from a static folder, and finally creating a SvelteKit project and configuring it to produce static content into
that folder. But let's do a short detour on why this might be useful!
Combining native executable with Web UI
Native graphical user interfaces are not easy on any platform, and after
looking at Qt, WxWidgets, Electron etc. I decided all had either major
shortcomings, huge learning curves or resulted in way too large packages.
Doing a native web server, on the other hand, is quite easy using Go. I
also investigated C and C++, but at least on Windows you very quickly run
into MinGW vs. Visual Studio issues, runtimes, build systems and all that chaos,
whereas Go pretty much produces executables with minimum fuss.
Once you have a web server, you can just serve a web UI and the user
can run the executable and open the UI in their browser.
Simple web server with Go
Once you are comfortable creating a "Hello world" level app in Go, making a
simple app for web server is not too hard:
$ mkdir project$ cd projectproject$ go mod init example/project
Here's a simple web server you can paste into main.go
package mainimport ( "encoding/json" "log" "mime" "net/http")func databases(w http.ResponseWriter, r *http.Request) { w.Header().Set("Content-Type", "application/json") w.Header().Set("Access-Control-Allow-Origin", "*") // for CORS w.WriteHeader(http.StatusOK) test := []string{} test = append(test, "Hello") test = append(test, "World") json.NewEncoder(w).Encode(test)}func main() { // Windows may be missing this mime.AddExtensionType(".js", "application/javascript") http.Handle("/test", http.HandlerFunc(databases)) http.Handle("/", http.FileServer(http.Dir("static"))) log.Fatal(http.ListenAndServe(":8080", nil))}
Today as I was finishing my Go+SvelteKit article, I ran into frustrating
Chrome error message:
Failed to load module script: Expected a JavaScript module script but the
server responded with a MIME type of "text/plain". Strict MIME type checking
is enforced for module scripts per HTML spec.
Don't you just love Chrome? It knows what it needs to do (load a JavaScript
module), but utterly refuses to do that because of a wrong MIME type. This
happened with a client-side SvelteKit application, when it tried to open some
part of the .js code.
At the time of writing, it seemed I could not find the answer easily to this
one, but there actually seems to be a StackOverflow solution discussing
this. But to help others hitting the same issue:
The problem on my Windows install was likely that Windows 10 registry did not
contain a MIME type definition for .js files. Informing user how to tweak
registry to get your program working is not ideal, but thankfully you can
augment the mime types:
import "mime"func main() { // Windows may be missing this mime.AddExtensionType(".js", "application/javascript") // And then you create the FileServer like you normally would http.Handle("/", http.FileServer(http.Dir("static")))}
After adding the mime fix, remember to force reload Chrome page (hold Control key down while you press refresh), otherwise the problem persists as Chrome does not
really bother reloading the offending files.
I've had an iPad Pro 12.9" for some time, and been happily using it for sheet
music when playing the piano. However, having to interrupt your playing to
swipe to the next page does get annoying. You can get a $100 commercial
AirTurn pedal,
but since one can get a microcontroller from Ebay/Aliexpress for $4 and a
simple foot pedal switch
for $2, I thought it would be a fun one evening hacking project. It turned out
quite nice:
Getting started: ESP32 devkit
The sheet music applications on iPad (and Android) usually have
bluetooth keyboard support, turning the page when user presses an
arrow key or spacebar. So the minimum viable product is just a
bluetooth-enabled microcontroller that can pair with the iPad and
send a single key upon request.
The ESP32 chip has both WiFi and Bluetooth, and I chose it for this project, as
it is readily available in a compact form factor, and it's easy to program with
Arduino. Searching [AliExpress](https://www.aliexpress.com for ESP32 should
give you plenty of options.
I had a ESP32 board labelled with "ESP32 DEVKITV1" in my parts box, and it was
quite easy to set up with this ESP32
tutorial:
Install the driver for USB-UART bridge
Add source URLs for ESP32 to Arduino and install ESP32 support
Select "DOIT ESP32 DEVKIT" from the board menu
Hold down "Boot" button on the board while selecting "Upload",
release when the console says "Connecting..."
Before you proceed with the tutorial, check that you can get the
lights blinking or flash some other example code successfully for
the board. There are plenty of resources around if you hit into
any issues! I had to google the step 4 myself, although it would
have sufficed to read the linked tutorial carefully...