WebSocket is a protocol that allows for real-time, bidirectional communication between a client and a server. It is often used in web applications to enable features such as chat, live updates, and multiplayer games.
In this tutorial, I will show you how to create a minimalistic WebSocket server using Go and the nhooyr websocket library, and a JavaScript client to test it out. You will learn how to handle WebSocket connections, send and receive messages, and close the connection when necessary.
By the end of this tutorial, you will have a working WebSocket server and client that you can use as a starting point for your own WebSocket-based applications.
Setting up the project
You should first set up a simple "Hello world" go project, something along the lines of this tutorial. After you have a project going, let's install nhooyr.io/websocket WebSocket library (Go's own seems deprecated and Gorilla development has ceased some years ago):
$ go get nhooyr.io/websocket
The whole system will consist of main.go that will contain a simple net/http server that will:
Serve a simple WebSocket echo server at /echo
Serve static files from static subfolder – essentially other addresses including / will try content from there. We'll
put index.html under that subfolder.
Basic webserver stuff:
func main() { address := "localhost:1234" http.HandleFunc("/echo", echoHandler) log.Printf("Starting server, go to http://%s/ to try it out!", address) http.Handle("/", http.FileServer(http.Dir("static"))) err := http.ListenAndServe(address, nil) log.Fatal(err)}
Now the echoHandler will do a few essential items:
Upgrade the connection into a WebSocket one with websocket.Accept
Log errors and defer connection close in case of errors
Loop forever (or actually 10 minutes in this sample), reading messages from
the socket and writing them back.
Note that I've used InsecureSkipVerify to accept connections from any
origin, you might want to modify the code for a tighter policy:
I have to confess I have a thing for small prototyping boards, especially ones
with Bluetooth or WLAN connectivity. So when I was offered the opportunity to
get a couple of Seeed Studio's tiny Bluetooth
devboards with Nordic's
nRF52840 in them to try out, I
jumped at the opportunity. So full disclosure, I did not buy these myself, but neither did I get any compensation, so what follows will be rather unbiased first impressions! I will cover:
The basic specifications of the two units
How to (re)program the device with Arduino
Help to troubleshoot upload.tool.serial errors on Arduino
Tips and notes on using the USB mass storage mode
Initial summary
I'm interested in trying out the PDM microphone, accelerometer and BLE functionality later on, so check back for updates!
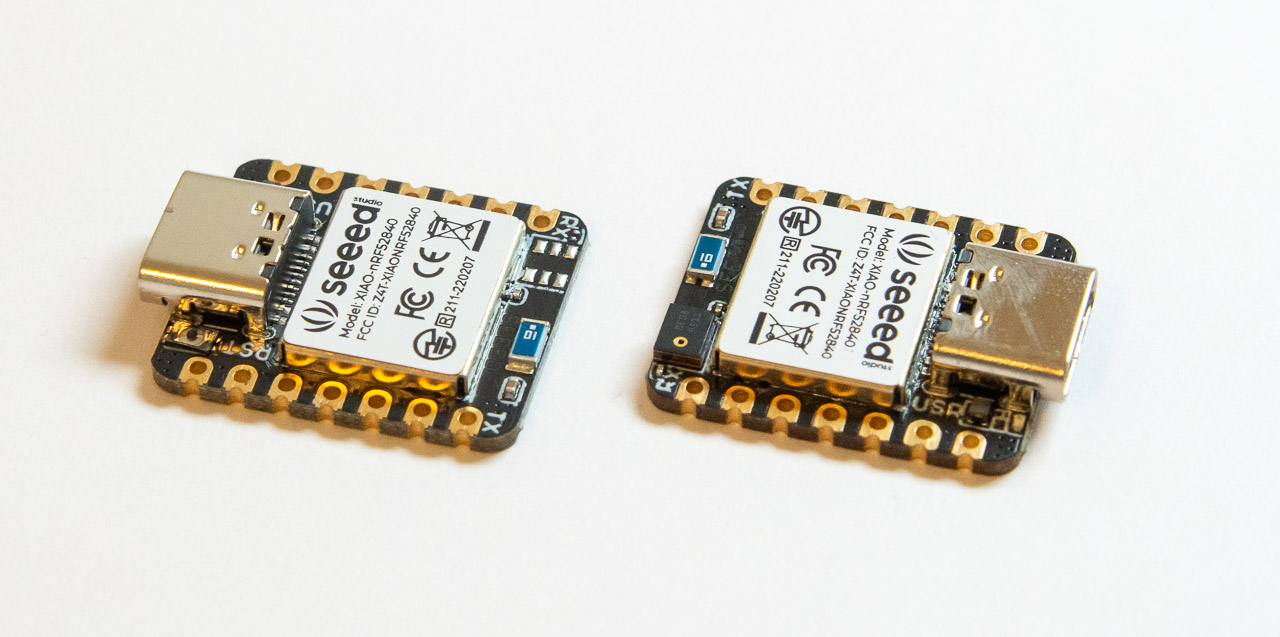
Basic specifications of the Seeed XIAO BLE nrf52840
The Seeed XIAO BLE units come in two varieties, both sharing quite beefy specs:
Bluetooth 5.0 with an onboard antenna
Nordic nRF52840, ARM Cortex-M4 32-bit processor with FPU, 64 MHz
Low power consumption and battery charging chip for untethered IoT use cases
Onboard 2 MB flash
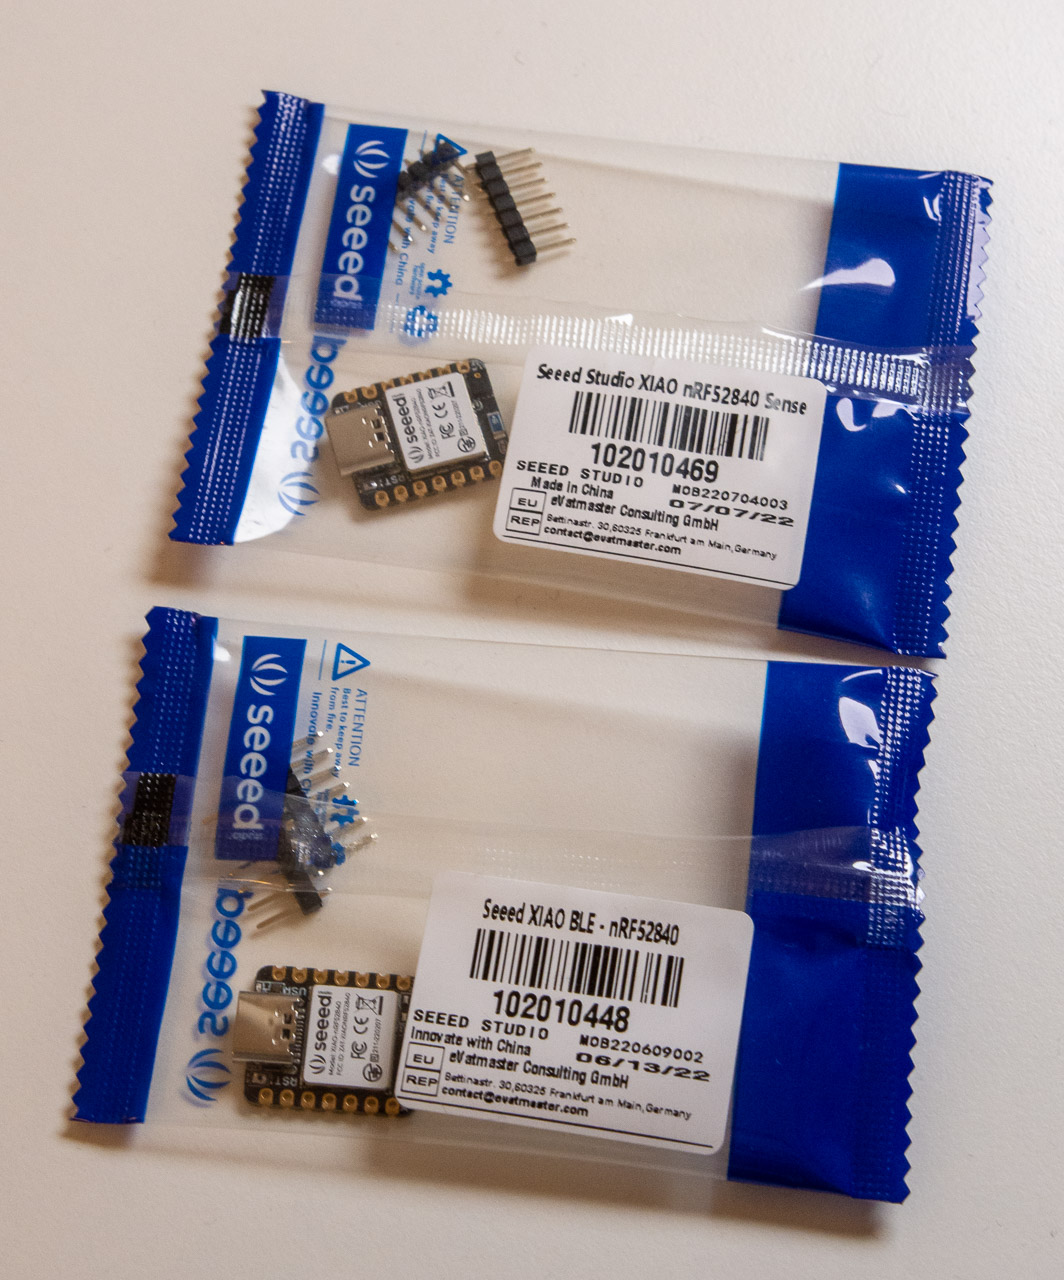
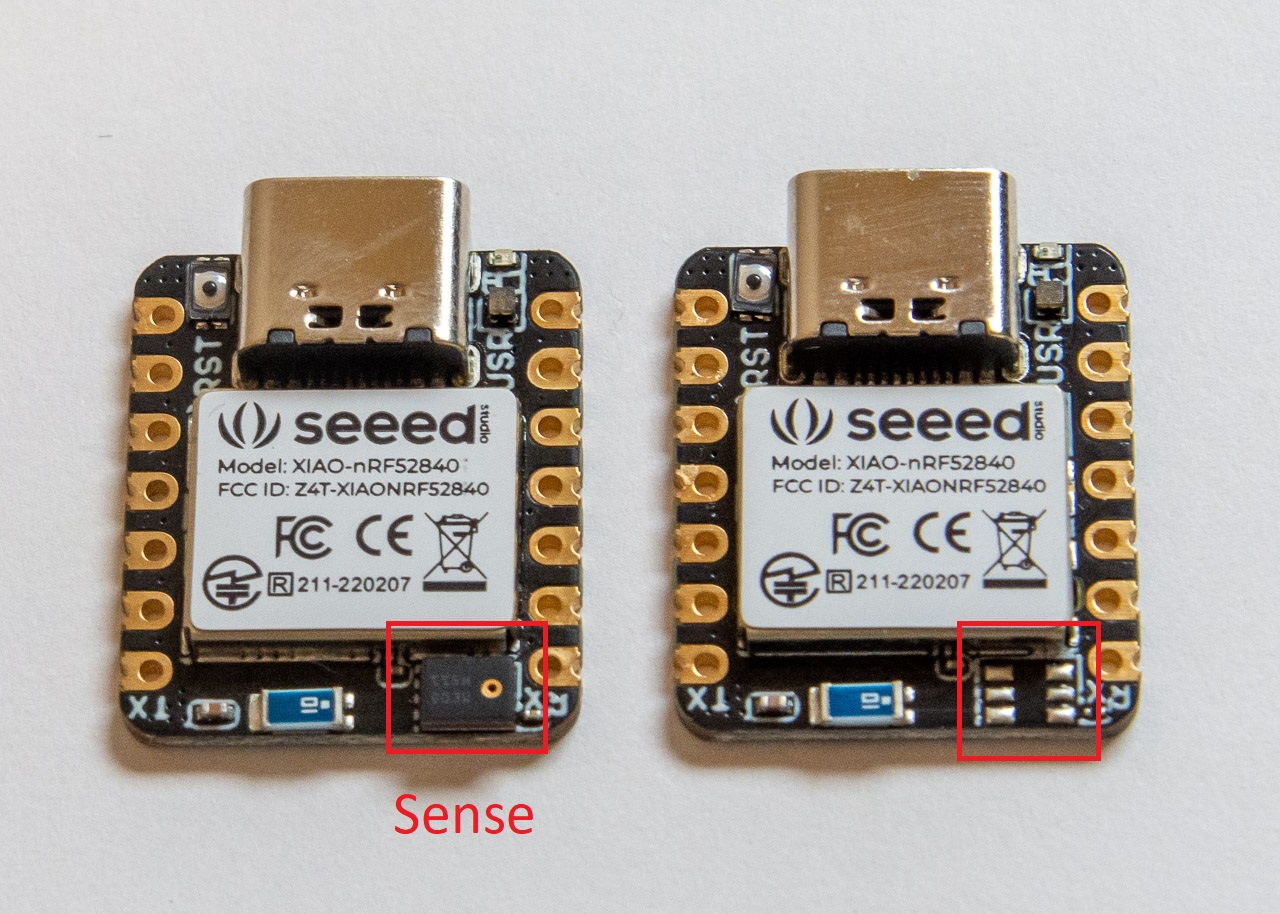
Additionally, the Sense variant contains a PDM microphone and a 6-axis accelerometer. The units arrived from China quite quickly and came in sweet little Seeed plastic packages, pin headers included (not soldered in):
You can get both directly from Seeed, with very reasonable $9.90 and $15.99 price points. Nordic's chips are quite hard to source from AliExpress cheaply (yes I have looked :), so I'd consider both pretty much a bargain.
Board quality seems very good, pads are shiny and components well placed. The USB port is of modern USB-C variety, and the form factor is really small,
just 20 x 17.5 mm or the size of a nickel x dime. and the thickness of a half dollar or so (U.S. readers, you're welcome!). The PCB is one-sided which makes it easy to embed in various configurations.
Outside differences of the basic model and Sense variant is one additional chip that contains the PDM microphone. I think the accelerometer is hidden inside the (seemingly FCC and CE compliant) shielding.
There is also an absurdly tiny reset button on the opposite corner to the microphone pad (top left above) that is a bit tricky to press. I'd prefer a slightly larger one, but it beats shorting pins any day.
Classic blink test with Arduino
You can follow the instructions on Seeed Studio wiki to install the necessary development tools to build firmware for the device. Short version:
Just a small note / Gist type of thing for today: I got tired of adding w.Header().Set("Access-Control-Allow-Origin", "*") to every handler function in my small Golang
web app. I'm using Julien Schmidt's excellent httprouter module for simple routing. Turns
out the Basic Authentication example is quite simple to adjust for a
set-and-forget type of httprouter.Handle middleware:
// https://github.com/julienschmidt/httprouter middleware to set CORS headerfunc MiddleCORS(next httprouter.Handle) httprouter.Handle { return func(w http.ResponseWriter, r *http.Request, ps httprouter.Params) { w.Header().Set("Access-Control-Allow-Origin", "*") next(w, r, ps) }}
Using the middleware is simple, just wrap your normal handler function:
router.GET("/someurl", MiddleCORS(SomeURLFunc))
Or both the middleware and the function it takes implement httprouter.Handle, you can just chain multiple middleware with MiddleCORS(AnotherMiddleware(SomeURLFunc)).
I got tired of the fact, that Philips Hue application does not seem to have
any easy way to set multiple lights to different colors (and possibly brightnesses)
at once. Thankfully, there is a great "REST API" to query light and set status!
Read on how to query your lights, set them, and do RBG to Philips Hue XY (or X, Y)
colorspace conversion with Python!
Connecting and configuring your Philips Hue for API access
This is a prerequisite step. Find out your Hue Brige's IP and create a user
(simple method of authentication). It's all covered in Get started.
Write down your IP and the username, and proceed
to activate your user and test it according to
instructions. Once you are done, you should be
able to also open the lights list in your
browser and see a lot of info:
https:///api//lights
Listing Your Connected Philips Hue Lights with Python
Alright, with the prerequisites done, let's do
a simple test with Python, and query that same
address parse the returned JSON, and pretty print
it. You'll need Python 3.10+ for this:
import urllib.requestimport ssl, json, pprintcontext = ssl._create_unverified_context()def get_json(url): """Do a HTTP GET request and return response parsed as JSON.""" print(url) req = urllib.request.Request(url=url, method='GET') f = urllib.request.urlopen(req, context=context) print(f.status, f.reason) return json.loads(f.read())# Replace these with your configuser = 'yourverylongusernamestring'ip = '192.168.1.123'data = get_json(f'https://{ip}/api/{user}/lights')pp = pprint.PrettyPrinter(indent=4)pp.pprint(data)for k in data: print(k, data[k]['name'])
I wanted to gift some bitcoin to a friend, and came up with a fun idea of
writing them a poem with words making up an BIP-39 mnemonic word list.
Then they can easily type in the 12 words in Electrum and take control
of their wallet (and maybe transfer the amount to a wallet I don't have
access to :).
BIP-39 Fundamentals
Basic idea of BIP 39 is that there is a wordlist of 2048 words, so each word
choice encodes 11 bits (2^11 = 2048) of entropy. With 12 words, you have
12*11=132 bits, enough for 128 bits of of true entropy and a 4 bit checksum.
You can read all about it in the
BIP-39
itself.
Now only problem is, that the last word is not random, but must match
the top 4 bits of SHA256 checksum of the preceding 128 bits. So essentially
you can choose the 11 first words, and then try to see which choices of
12th word end up with a valid word list mnemonic.
One could manually type stuff into Electrum word list box, but trying 2048
options sounds pretty frustrating (on average, every 16th try will work).
So let's do it in Python!
Validating a BIP-39 word list in Python
First, grab the English wordlist — and yes BIP-39 is not the best way as it depends on the word list, but it is standard enough. Then we read
it in with Python:
import hashlib, binascii, sysnums = {}wordlist = []with open('english.txt') as fin: i = 0 for word in fin: nums[word.strip()] = i wordlist.append(word.strip()) i += 1
Just a quick note after yesterday's S2 Pico OLED
tutorial.
I encountered some hiccups getting Serial.println() to work on Arduino with
this board. Essentially nothing would come out of Serial Monitor after reprogramming.
I think the core of the issue is that the ESP32-S2 has native USB.
ESP8266 and older ESP32 boards used a USB serial converter chip, so programming
over serial vs. printing to serial happened without any glitches to the USB. Now
with native USB I think here's what happens:
You press Button 0, cycle Reset and release B0
ESP32-S2 boots into "programming mode" and initializes native USB as COM port
You hear the USB connection sound as COM port is assigned
Arduino reprograms the flash
You manually press reset
USB COM port actually drops at this point
When you have Serial.begin(); in your code, it now initializes native USB as
COM port again
You hear the "USB chime" again from your computer, and COM port is assigned
Now if you're used to having Arduino Serial monitor open all the time, the
same COM13 that was there during programming on my PC is now a "new" COM13.
It seems the serial monitor doesn't notice the change. Solution is simple:
Reprogram your chip.
Reset, wait for the "chime"
Only now open the serial monitor
The irksome thing is, that I'll now need a delay in setup() to see what's
going on. Maybe I have an old version of Arduino or something. If you
know another solution, you're welcome to drop me a line (me at codeandlife.com)