Automatic Eleventy (11ty) Site Updates with Github Hooks
A while ago I updated my site to Eleventy.js. This improved my blogging process considerably, as Markdown is quick to write, and especially code samples are easy to copy-paste without any escaping.
I put all my posts into one Github repository. Using Visual Studio
Code, I get nice realtime preview, and once I'm
done, I just git commit, git push on my computer, and git pull on the
server, and regenerate the site with Eleventy.
Now only issue is that one usually finds 5-10 things to change after every post, and while VS Code has great git support built in, even the simple update process gets a bit tedious with commands being run on SSH side. So I started wondering if I could use the Github webhooks to automate the regeneration. Turns out: YES.
Simple Script to Pull Markdown from Github and Regenerate
First component is of course a small shell script to automate the git pull and
regeneration. One could do a more elaborate one, but this worked for me server-side:
#!/bin/sh

cd ~/myblog_post # here are the .md files
git pull
cd ~/myblog_eleventy # here's the 11ty site generator
npx @11ty/eleventy --input=. --output=../apps/myblog_static # hosting dir
Node.js Mini-Server for Github Webhooks
Next, I needed to set up a web server that would get the HTTP POST from
Github whenever I push changes. Here your configuration will depend on
hosting you have, but Opalstack for example
has simple installation of a Node.js application. I usually disable the
automatic restarting (crontab -e etc.), use ./stop script and run my server manually for a while to see everything works, before restoring the crontab.
If you choose to forego Github webhook security mechanisms, the code is really simple, but in that case, anyone knowing the addess of your server can flood you with fake push requests. So let's take the high road and use this gist to verify Github hooks! I chose to use Polka so I needed to modify the headers part of the code just a bit:
const { exec } = require("child_process");
const polka = require('polka');
const { json } = require('body-parser');
const crypto = require('crypto')

const port = 12345;
const secret = 'ohreally :)';
const sigHeaderName = 'x-hub-signature-256';
const sigHashAlg = 'sha256';

// Middleware to verify Github "signed" POST request
function verifyPostData(req, res, next) {
  console.log('Verifying signature', req.headers[sigHeaderName]);

  if (!req.rawBody) {
    console.log('Request body empty');
    return next('Request body empty');
  }

  const sig = Buffer.from(req.headers[sigHeaderName] || '', 'utf8');
  const hmac = crypto.createHmac(sigHashAlg, secret);
  const digest = Buffer.from(sigHashAlg + '=' +
    hmac.update(req.rawBody).digest('hex'), 'utf8');

  if (sig.length !== digest.length || !crypto.timingSafeEqual(digest, sig)) {
    console.log('Got request with invalid body digest');
    return next(`Request body digest (${digest}) did not match
      ${sigHeaderName} (${sig})`);
  }

  console.log('Verification done.');
  return next()
}

polka()
  .use(json({ verify: (req, res, buf, encoding) => {
    // Store raw body data in req rawBody variable
    if(buf && buf.length) req.rawBody = buf.toString(encoding || 'utf8');
  }
  }))
  .get('/', (req, res) => { res.end('Hello, polka!'); }) // just for testing
  .post('/myblog', verifyPostData, (req, res) => {
    console.log('Article repo updated, generating site...');
    exec('~/blog_eleventy/gen.sh', (error, stdout, stderr) => {
      if(error) console.log(`error: ${error.message}`);
      if(stderr) console.log(`stderr: ${stderr}`);
      console.log(`stdout: ${stdout}`);
    });
    res.end(`Hello, Github!`);
  })
  .listen(port, () => {
    console.log(`> Running on localhost:${port}`);
  });
For some reason, my particular configuration had the Github authorization
header in req.headers['x-hub-signature-256'] instead of the capitalized
X-Hub-Signature-256. Go figure.
Once you have the server running, you can try posting some data into the server:
[user@server githook]$ curl https://githook.myblog.com/myblog \
> -X POST -d '{"hello":"world"}' \
> -H "Content-Type: application/json"
Request body digest (sha256=a3b12d5baf84c382de2eedd057f8bc7ff8dad560d55f55b8613d3d326355eb6c) did not match
      x-hub-signature-256 ()
Note that you have to specify the Content-Type header in order for the json parser
to do its magic. I had some debugging issues until I catched that one!
Setting up Github webhooks
With everything supposedly working and your secret at hand (I'm not really using the
ohreally :) you see in the code), navigate to the settings page of your repository (https://github.com/nick/reponame/settings, the cog is in the top right corner of
your repo) and to the "Webhooks" section to set it up:
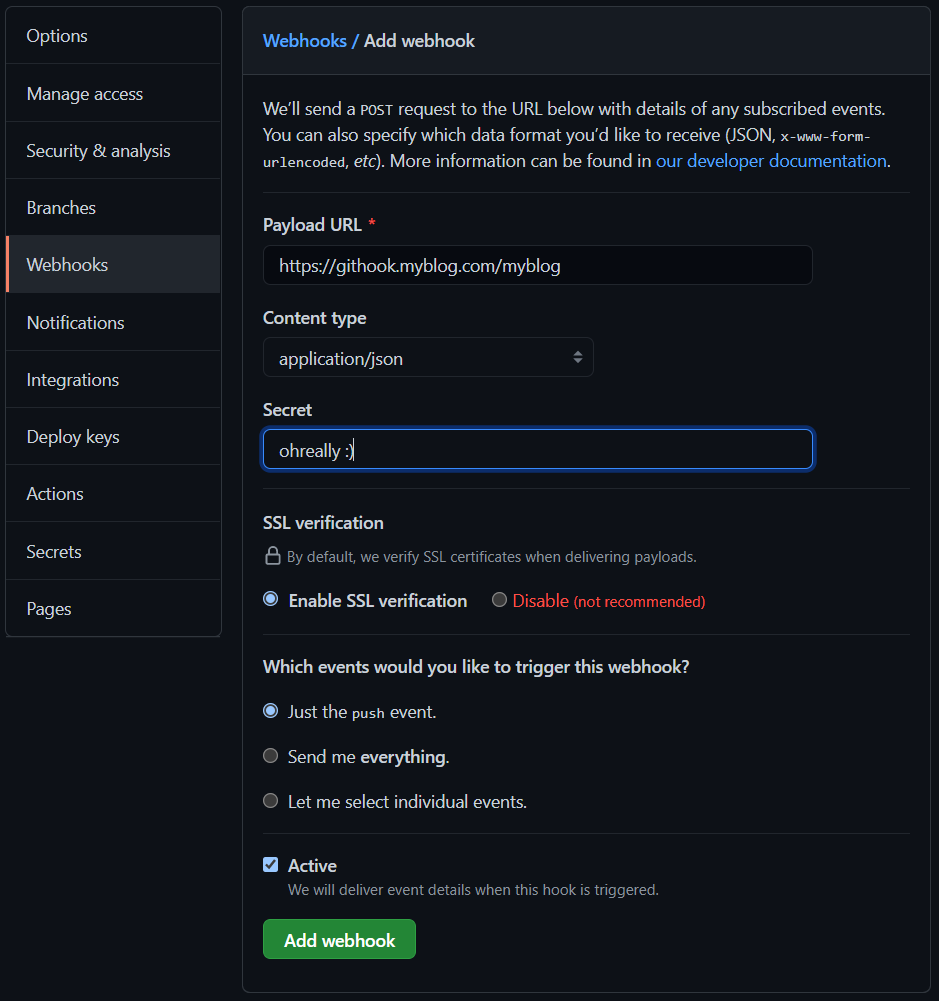
Note that the Content type should be set to application/json and it's enough
to just receive push events for this one. Make sure you have the secret in a
safe place, as you won's see it after this!
Conclusions
That is basically it. Once you are done, make a push to your repo and see if the script runs successfully. I'm doing that right now to post this. ;)