There are few tools that are essential for an electronics hobbyist. When I started, I had a soldering iron, a multimeter and some components, and that was about it. That got me quite far because you can do simple debugging even with a multimeter, but once you start to do any communications, you will either work in the dark or get a signal analyzer, oscilloscope, or both. I reached that point about 9 months into my hobby, and eventually decided to get an entry-level PicoScope from Picotech. You can read the whole story from my PicoScope 2204 review from four years ago.
Long story short, I was extremely happy with my Picoscope, and I’ve been using Picotech’s products ever since in variousprojects. In the past years, I’ve also been collaborating with Picotech, so I’ve had the chance to use also their higher end models, including the frighteningly powerful 4-channel, 200 MHz, 16 bit PicoScope 5444B, which is really great but maybe even too hefty for my use. So when I was offered the chance to try out Picotech’s latest generation of their entry-level 2000 series published just a month ago, I was immediately in.
Without further ado, let’s get reviewing!
PicoScope 2000 series overview
The new PicoScope 2000 series is divided into roughly two groups of equipment: The entry models 2204 and 2205 range in price from 139€ for the 10 MHz 2-channel 2204A to 419€ 2205A and 2405A which are 25 MHz and have MSO (mixed-signal oscilloscope, i.e. it has 16 channel digital part as well) capability and 4-channels, respectively. Don’t let the low bandwith confuse you, even these models have sampling rates ranging from 100 MS/s to 500 MS/s, so you will get quite a lot of measuring power out of them.
Biggest limitation with 2204 and 2205 models is the buffer size, which ranges from 8 kS to 48 kS, so for longer captures than a few waveforms, only option is the continuous capture over USB which worked at a steady rate of 1 MS/s the last time I used it. So you can do unlimited capturing of signals around 100 kHz, but above that it’s the normal oscilloscope triggering business — that’s the way scopes have always worked from their beginnings, so it gets the job done as well.
2204
2205
2206
2207
2208
Bandwith
10 MHz
20 MHz
50 MHz
70 MHz
100 MHz
Sample rate
100 MS/s
200 MS/s
500 MS/s
1000 MS/s
1000 MS/s
Resolution *
8 bit
8 bit
8 bit
8 bit
8 bit
Memory
8 kS
16 kS (48 kS w. MSO/4ch)
32 MS
64 MS
128 MS
Price (2015-22-05)
139 €
209 €
319 €
459 €
629 €
Options
–
MSO or 4ch
MSO or 4ch
MSO or 4ch
MSO or 4ch
*) Resolution for repeating signals can be increased to 12 bit with multiple samples
Picotech launched a new set of very compact but powerful 2000 series oscilloscopes just a few weeks ago, and with my long-term collaboration with them (they really rock :) they were kind enough to send me a unit for reviewing! The review will hopefully come quite soon, but meanwhile, enjoy this amazing unboxing video. And with “amazing”, I mean “I did not completely fail the lighting and achieved 90 % intelligible pronunciation”.
The unit in question is the high-spec 100 MHz 2208B with 16 channel logic analyzer unit built in. I knew that this replacement line to the old light blue 2000 series scopes was small, but I was still amazed by the compactness of this beast. Having had a top end 5000 series Picoscope for a few years, I’m seriously considering the “downgrade”, as I mostly use just one or two channels of the scope, and even those are in many cases digital signals. But I’ll return to this in the review later.
Let me know what you think, either here on in the Youtube comments section!
I’ve been tinkering with IR and the TSOP38238 IR receiver modules I got from Adafruit and Sparkfun. That’s right, plural, as I burned the first one — be REALLY sure not to mix ground and VCC with this one! I ordered 10 more from AliExpress just to make sure I have spares in case I burn my second one as well…
There are IR libraries for Arduino already, but they were a bit complex to my taste, as I’m first planning just to record one IR code from my bulky Sony projector remote and make a small trinket to send that on button press. The TSOP382 already demodulates the signal, so I just want to record the times the remote IR led is on, off, on, off, and so on. So I made an Arduino sketch to do just that: Count loop cycles, detect when signal goes from high (no IR signal detected) to low and vice versa:
#define MAX_LEN 256int seq[MAX_LEN], slen = 0, cnt = 0;int irPin = 2, val = HIGH;int ledPin = 13, strobe = LOW;void setup() { Serial.begin(9600); pinMode(irPin, INPUT); pinMode(ledPin, OUTPUT); Serial.println("Start!");}void loop() { int val2 = digitalRead(irPin); if(val2 == val) { cnt++; // Following line is a dummy to make if and else sections // take about the same time if(slen < MAX_LEN) seq[0] = cnt; if(cnt > 30000) { if(slen) { Serial.print("int onoff["); Serial.print(slen-1); Serial.println("] = {"); for(int i=1; i<slen; i++) { Serial.print(seq[i]); if(i+1 < slen) Serial.print(", "); if(i%10 == 0) Serial.println(); } Serial.println("\n};"); } cnt = 0; slen = 0; } } else { // transition if(slen < MAX_LEN) seq[slen++] = cnt; // store if space left val = val2; cnt = 1; } delayMicroseconds(5); // results in around 20 us per loop digitalWrite(ledPin, strobe); // strobe a LED strobe = (strobe == LOW) ? HIGH : LOW; // toggle}
Using it is easy. Just double-check the IR sensor pins, wire GND to Arduino ground, VCC to Arduino 5V (if your detector is 5V tolerant) and signal pin to digital pin 2. Point a remote towards the detector and quickly press a button (most remotes repeat signals and we have only a small buffer for storing transitions). The serial monitor will print out timings for on and off cycles of the remote’s IR signal (first entry is “on”, second “off”, then “on”, “off”, …):
Look what the mailman brought: It’s a shiny (or maybe matte?) BeagleBone Black, freshly arrived (actually it’s been over a month, but time sure flies…) from Newark element14! I’ve been doing Raspberry Pi related hacking for a while, but especially when the Pi was still fresh and new, I did from time to time consider if the grass would be greener on other side of the fence. Or blacker, in this case, as I mean BeagleBone Black.
BeagleBone was long very much more powerful than Raspberry Pi, but now that Pi2 has come out, price and specification-wise they are closer than ever. A quick personal comparison chart:
When Pi1 was out, the BeagleBone Black with the more modern Cortex-A8 chip and higher clockrate was definitely the more powerful, but now with 4-core Pi2, the tables have somewhat turned. Still, the clockrate is higher and there’s more GPIO. And speaking of GPIO, my Raspberry Pi vs. Pi2 GPIO benchmark has gotten a lot of interest, so I thought the best way to take this black beauty for a test drive would be to benchmark BeagleBone Black GPIO in a similar way.
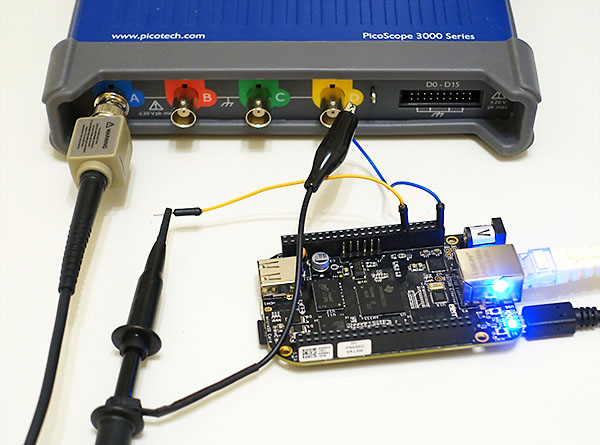
Test setup
The test subject is the most recent revision C of BeagleBone Black. I followed the (a bit lacking in detail and readability) Getting Started guide and downloaded the latest Debian Jessie image (8.3, 2016-01-24), flashed it to card and ran apt-get update and apt-get dist-upgrade (2016-04-14).
I’ve been playing around today with BottlePy, an excellent mini-framework for Python web development. However, getting Python MySQL support is always a hassle, I never know if MySQLdb has died or not, so I thought I’d try PyMySQL for a change.
In addition to being just generally awesome, Bottle has a nice plugin syntax, and even a great 60-line sample of a SQLite plugin. So I adapted it for PyMySQL, turns out this was quite easy:
import pymysql.cursorsimport inspectclass PyMySQLPlugin(object): ''' This plugin passes a pymysql database handle to route callbacks that accept a `db` keyword argument. If a callback does not expect such a parameter, no connection is made. You can override the database settings on a per-route basis. ''' name = 'pymysql' api = 2 def __init__(self, db, user, password, host='localhost', charset='utf8mb4', keyword='db'): self.host = host self.user = user self.password = password self.db = db self.charset = charset self.keyword = keyword def setup(self, app): ''' Make sure that other installed plugins do not affect the same keyword argument.''' for other in app.plugins: if not isinstance(other, PyMySQLPlugin): continue if other.keyword == self.keyword: raise PluginError("Found another %s plugin with "\ "conflicting settings (non-unique keyword)." % self.name) def apply(self, callback, context): # Override global configuration with route-specific values. #conf = context.config.get('sqlite') or {} #dbfile = conf.get('dbfile', self.dbfile) # Test if the original callback accepts a 'db' keyword. # Ignore it if it does not need a database handle. args = inspect.getargspec(context.callback)[0] if self.keyword not in args: return callback def wrapper(*args, **kwargs): # Connect to the database db = pymysql.connect(host=self.host, user=self.user, password=self.password, db=self.db, charset=self.charset, cursorclass=pymysql.cursors.DictCursor) # Add the connection handle as a keyword argument. kwargs[self.keyword] = db try: rv = callback(*args, **kwargs) #if autocommit: db.commit() #except sqlite3.IntegrityError, e: #db.rollback() #raise HTTPError(500, "Database Error", e) finally: db.close() return rv # Replace the route callback with the wrapped one. return wrapper
As you may see, there is no autocommit support and graceful recovery from database errors is something that is missing as well, but it’s a great start. There were a couple of GitHub projects with similar aims, but those seemed a bit behind the times (one was adding Python 3.4 support, and I’m already on 3.5, for example). A little NIH syndrome for me, maybe. Using the above library is quite easy:
from bottle import install, routefrom somefile import PyMySQLPluginpymysql = PyMySQLPlugin(user='dbuser', password='dbpass', db='dbname')install(pymysql)@route('/demo')def demo(db): # This method has a "db" parameter, and the plugin activates with db.cursor() as cursor: sql = "SELECT `id`, `password` FROM `users` WHERE `username`=%s" cursor.execute(sql, ('johndoe',)) result = cursor.fetchone() return str(result)
Look what a little beauty the mailman brought! I participated the Red Bear Duo Kickstarter Campaign a while ago, and the folks at Redbear did a really professional job in delivering on the promises of that campaign.
Headline features include ARM Cortex M3 120 MHz microcontroller with plenty of RAM and flash, and of course dual WiFi and Bluetooth connectivity. Setting up the Duo was quite simple by following the instructions provided, once I realized I’ll need to use the Zadig tool as instructed in this sub-howto (Redbear guys: I think 4-5 separate pages to get one started on Windows is something that might be optimized), I got the firmware updated and everything set up. Basic outline of my installation was about this:
Plug in the board and see LEDs light up
Try to install the serial driver, only to realize I already had working serial (I probably have all usb serial drivers between heaven and earth installed due to encounters with various devboards)
Connect to COM6, 9600 with Putty to verify it works as it should, note down device ID
Install dfu-util, and wonder why I cannot connect to the device, even with the yellow LED (looked more like yellow-green though) was blinking as it should
Use Zadig tool to install drivers when in DFU mode
Successfully update firmware and stuff
Reboot the board a couple of times and connect with Putty to COM6 to see the IP address
Visit the IP address to see the LED demo is working as it should! Nice!
Once I had the basics figured out, I wanted to try out the Particle.io cloud development platform. It seems like an Arduino on cloud steroids, meaning that instead of flashing the device over USB cable, you write the software in a web interface, and flashing the device will upload the sketch to your device using the active wifi connection on Redbear Duo (I believe the device is periodically polling Particle.io service to see if there is a new sketch to download).