I've long thought about learning
Lisp. Some time
ago I ran across Clojure and the map, set and
vector implementations felt like a modern addition. It's running on top of
JVM which is nice in
a sense, but a major pain in the ass when installing. Well, I swallowed my
wow to never install JDK again and got Clojure running quite painlessly.
To learn the ropes, I thought it would be a fun idea to rewrite Project
Euler problems 1-10 with Clojure to see how
it would compare against my language of choice for these types of algorithmic
problems, Python.
Just to make it more fun, I decided to implement them in my second favorite
language, Javascript as well. Since ECMAScript
9,
it's actually a pretty powerful and concise language, and coupling it with
Node.js unleashes some serious usage options outside
just web pages. Npm dependency hell sucks, but that's a topic for another post.
For more bare metal, I'm also doing C++ (basically sticking to C functionality
until maps and sets make themselves useful). Let's see how the languages stack up!
Project Euler Problem 1
The first problem in Project Euler is simple, add up numbers below 1000 that
are divisible with either 3 or 5 (or both). Modulo operator % can be used
to get the remainder of a number when divided by 3 and 5, and basically we
add all numbers that have either modulo as zero.
Python 3
With Python, the most concise implementation is to use the sum(iterable) and
a list comprehension, netting us a nice one-liner:
print(sum(i for i in range(1000) if i%3==0 or i%5==0))
After Angular, React.js and Vue, svelte is the new and
cool kid on the block. I have to admit, the compile-to-plain-javascript
philosophy is nice, and what is especially cool is the fact that with
Rollup.js you can easily bundle a svelte
app into easy-to-embed component.
I wanted to make a simple embeddable Svelte component for a friend of mine,
that would be as simple as possible to include in a blog post, web site or
similar with just:
The script should ideally just put the component in the same place. Turns out
this is really easy with Svelte. Let's dive in!
Setting up Svelte
You may want to read more about
rollup-plugin-svelte and
Making an app from excellent
Svelte tutorial to get more familiar with the tools used here, as I'll only
cover the bare essentials.
First you need to install the necessary plugins. We'll start with Rollup and
install it globally so you can just use rollup command to do things. If
you want, you can also install rollup
locally.
I initially got an error saying something about imports and after a bit of
googling found out that my Ubuntu version of node was very old (node -v
outputted 8.x.x when 10+ was needed) – if you encounter the same issue,
upgrade to a newer node (nvm is a great too to
do this).
Next make a product directory and install svelte and rollup-plugin-svelte:
We'll go really barebones with this tutorial, just a simple heading and a
paragraph. Create a Svelte component Embed.svelte:
<script>export let name; // from props</script><h1>Hello, {name}!</h1><p>This component was brought to you by <a href="https://codeandlife.com/">Code & Life</a>.</p>
Then we'll need a simple .js script to import that our mini-component and
inject it to the DOM of whatever page has included the resulting script.
Let's call this embed.js:
So, I started writing a file database and toolset called
fileson to take advantage of
AWS S3 Glacier Deep Archive
(let's just call it GDA from now on). With 1 €/mo/TB storage cost, it
is essentially a dirt cheap option to store very infrequently accessed data
like offsite backups.
Why not just use rclone? Well, I disliked the
fact that all tools do a ton of (paid) queries against S3 when syncing.
I thought a simple JSON file database should work to keep track what to
copy and delete. Well, that work is progressing, but as a part of that...
Encrypting on the fly with Python and Pycrypto(dome)
I started thinking that client side encryption would be
useful as well. AES is tried and tested, and it's easy to find sample
code
to do it. But it seems wasteful to first create encrypted files on your
hard drive, then upload them to AWS and finally delete everything.
Luckily, the Python AWS SDK boto3
has a great example on how to upload a file to
S3
with upload_fileobj that accepts "a readable file-like object". What does that
mean? Let's find out!
(note that you need to have the boto3 and pycryptodome libraries
installed to successfully run these examples)
I was cleaning up my code folder today and came across my JUnzip library. I realized that I added zipping to the "popular" (40 stars makes it my second most starred repo at the moment) library.
It supports "deflate" method is zlib is present, and "store" if not. You can take a look at the zipping demo code to take a deeper dive.
Additional thanks to Björn Samuelsson for his compact CRC32 routines that
were used in case there's no zlib.
This site has been migrated from Wordpress to 11ty based static site. I took the posts, categories, tags and comments as JSON data and made the necessary templates for conversion. Everything should be alot faster now.
The look is still a bit bare, and some things like tables seem a bit broken. Will address these issues hopefully during upcoming days, weeks and months. Enjoy!
PS. Comments are currently disabled, I was only receiving spam in any case. You
can check out my homepage at https://joonaspihlajamaa.com/ if you want to
contact me.
I’ve been occasionally doing backups of critical files to an external hard drive (in addition to cloud of course :). However, my nice portable drive was only 500 GB and lately I’ve pushed over 600 GB with my Nikon D7200 RAW files. Time for a new drive! Instead of boring mechanical, I noticed that the very nice NVME SSD with Adata XPG SX8200 Pro with 1 TB capacity was available nearby for just 140€ (ca. $150)!
Commercial alternatives like Samsung T5 cost around 230€ here, so I thought I’d get one of those M.2 enclosures. Unfortunately, the ones with NVME support started from 50€ up in Finnish web stores.
Ugreen to the rescue
When you have something like M.2 enclosure, you know every manufacturer actually puts Chinese electronics inside. Thus, AliExpress seemed like an obvious destination to check out. I’m bit doubtful to order actual NVME drive (there were some cheap flash drives in the past that did not actually have the reported capacity), the enclosure should be fine.
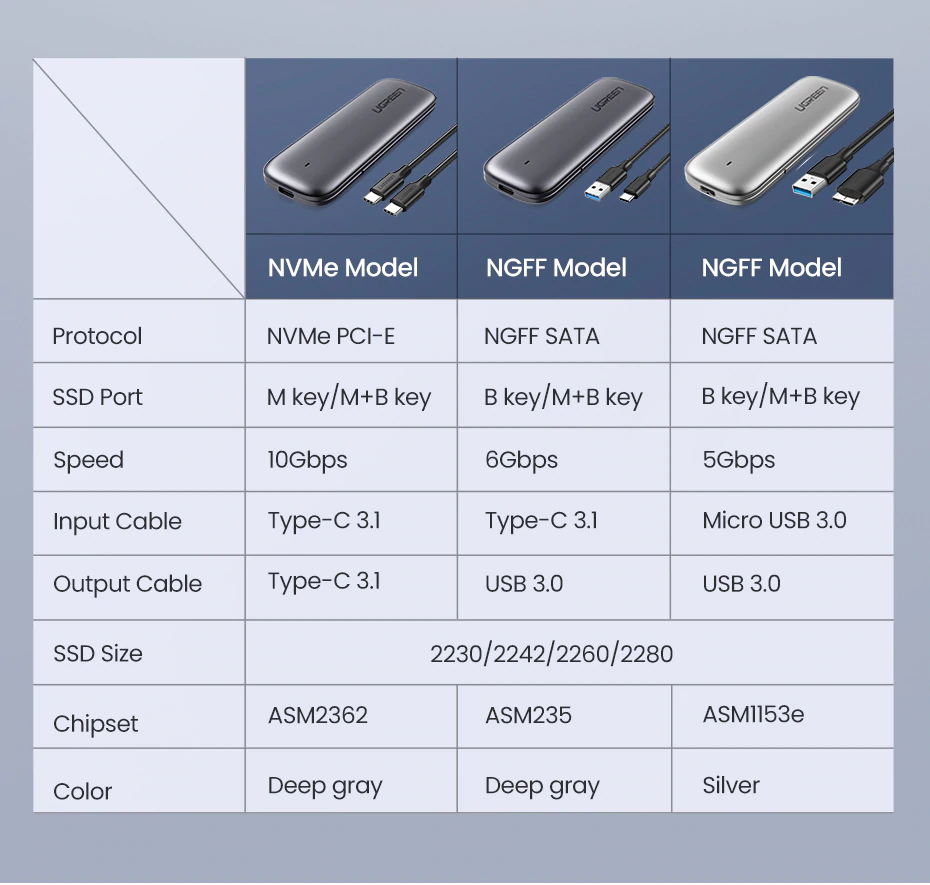
Enter Ugreen, my favorite in AliExpress store. I’ve purchased several chargers from them, many having QuickCharge functionality, and the packaging, quality and everything are always top notch. Therefore I was more than happy to find a range of NVME enclosures from them for just $15-30:
Ugreen M.2 SSD USB enclosures (from Ugreen product page)
Time to order one! Fast forward 2½ weeks of anxious wait…
Unpacking and installing SSD to M.2 enclosure
I got the NVME model which promised up to 10 Gbit/s data rates, and chose the option with extra USB cable as I don’t have USB-C ports on my MB. The package arrived a bit faster than the promised 21-25 days. See the gallery below for glorious images of various stages of setup.