Picoscope 2208B MSO Review
Sun, May 29, 2016 in post Electronics General Reviews 2205 2206 2207 2208 logic analyzer oscilloscope picoscope picoscope 2208b picotech review
There are few tools that are essential for an electronics hobbyist. When I started, I had a soldering iron, a multimeter and some components, and that was about it. That got me quite far because you can do simple debugging even with a multimeter, but once you start to do any communications, you will either work in the dark or get a signal analyzer, oscilloscope, or both. I reached that point about 9 months into my hobby, and eventually decided to get an entry-level PicoScope from Picotech. You can read the whole story from my PicoScope 2204 review from four years ago.
Long story short, I was extremely happy with my Picoscope, and I’ve been using Picotech’s products ever since in various projects. In the past years, I’ve also been collaborating with Picotech, so I’ve had the chance to use also their higher end models, including the frighteningly powerful 4-channel, 200 MHz, 16 bit PicoScope 5444B, which is really great but maybe even too hefty for my use. So when I was offered the chance to try out Picotech’s latest generation of their entry-level 2000 series published just a month ago, I was immediately in.
Without further ado, let’s get reviewing!
PicoScope 2000 series overview
The new PicoScope 2000 series is divided into roughly two groups of equipment: The entry models 2204 and 2205 range in price from 139€ for the 10 MHz 2-channel 2204A to 419€ 2205A and 2405A which are 25 MHz and have MSO (mixed-signal oscilloscope, i.e. it has 16 channel digital part as well) capability and 4-channels, respectively. Don’t let the low bandwith confuse you, even these models have sampling rates ranging from 100 MS/s to 500 MS/s, so you will get quite a lot of measuring power out of them.
Biggest limitation with 2204 and 2205 models is the buffer size, which ranges from 8 kS to 48 kS, so for longer captures than a few waveforms, only option is the continuous capture over USB which worked at a steady rate of 1 MS/s the last time I used it. So you can do unlimited capturing of signals around 100 kHz, but above that it’s the normal oscilloscope triggering business — that’s the way scopes have always worked from their beginnings, so it gets the job done as well.
| 2204 | 2205 | 2206 | 2207 | 2208 | |
|---|---|---|---|---|---|
| Bandwith | 10 MHz | 20 MHz | 50 MHz | 70 MHz | 100 MHz |
| Sample rate | 100 MS/s | 200 MS/s | 500 MS/s | 1000 MS/s | 1000 MS/s |
| Resolution * | 8 bit | 8 bit | 8 bit | 8 bit | 8 bit |
| Memory | 8 kS | 16 kS (48 kS w. MSO/4ch) | 32 MS | 64 MS | 128 MS |
| Price (2015-22-05) | 139 € | 209 € | 319 € | 459 € | 629 € |
| Options | – | MSO or 4ch | MSO or 4ch | MSO or 4ch | MSO or 4ch |
*) Resolution for repeating signals can be increased to 12 bit with multiple samples
Above the 2204 and 2205 sit the 2206, 2207 and 2208 which have 50, 70 and 100 MHz of bandwith, and much larger sample buffers from 32 MS to 128 MS. Sampling rates also go up to 1 GS/s so you can throw almost anything towards these ones and they’ll be able to handle it. Prices start from 319 euros (2-channel 50 MHz model) and go up if you want MSO or 4-channel version, or more bandwith and memory. These start to be in “professional hobbyist” range, but considering that amateur photographers spend around same money for an entry-level DSLR, they are still very well within the grasp of most people. All models have a 5-year warranty which gives confidence that you’re getting a quality product.
The review unit I have is the top of the line 2208B which has 2 channels and MSO, and 100 MHz bandwith. The software is the same for all models, so most everything I write here will apply to all models. I’ve made notes in the review if some feature requires a higher end model. If I was shopping for a scope, I’d get the 2206 with MSO, as the memory and sampling rate bumps are significant and the MSO is quite handy. The 2205 with 2 channels would be a great budget option as well, as 20 MHz / 200 MS/s should be enough for even USB low speed gadgets (think V-USB) and microcontrollers.
Package contents
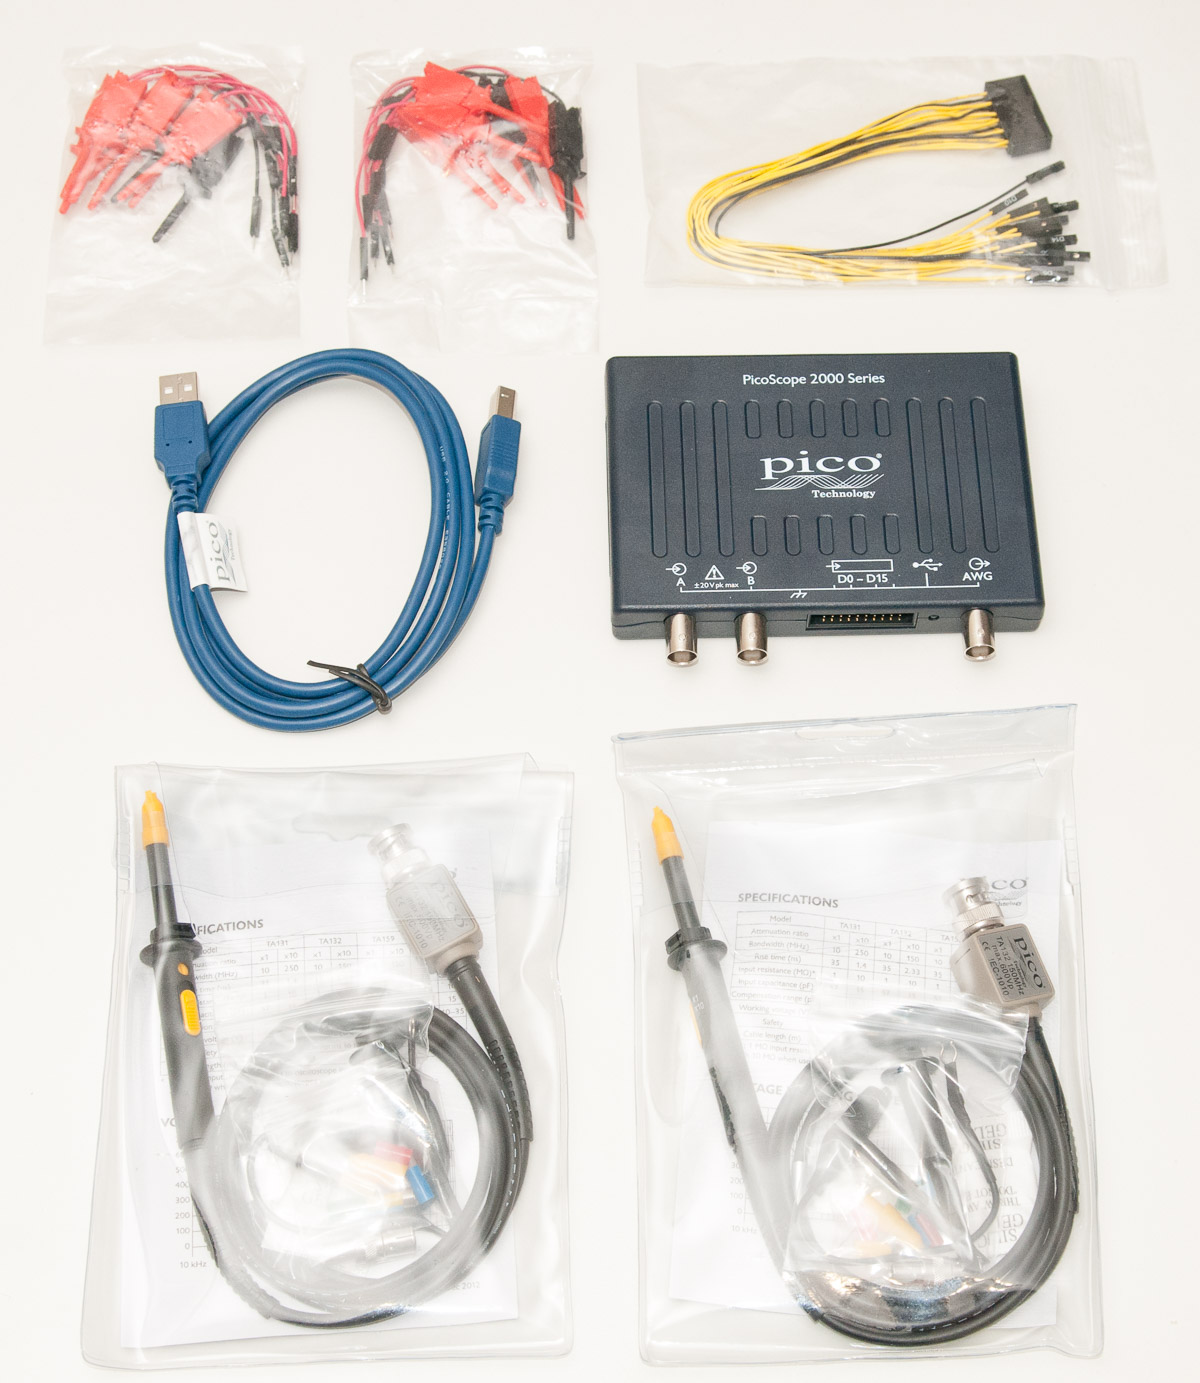
You can choose to get the 2-channel 2204 or 2205 models without the probes if you want to save a couple of euros getting the probes from a cheaper source, but I’m not sure it’s worth the effort. Other than that, all models ship with high quality Picotech probes. The MSO model also comes with a set of IC hooks and 20-wire female cable set that you can plug into the unit (16 signals, 4 grounds).
In addition to things in the photo above, there’s a quick start guide and software CD, but Picotech updates their software regularly, so I just downloaded the latest (beta) version from their website. Oh, and there’s a handy blue bag you can use to stove all these items when not in use. I have to admit I have never used it, though… If you want to witness the unboxing experience, you can check out my recent video:
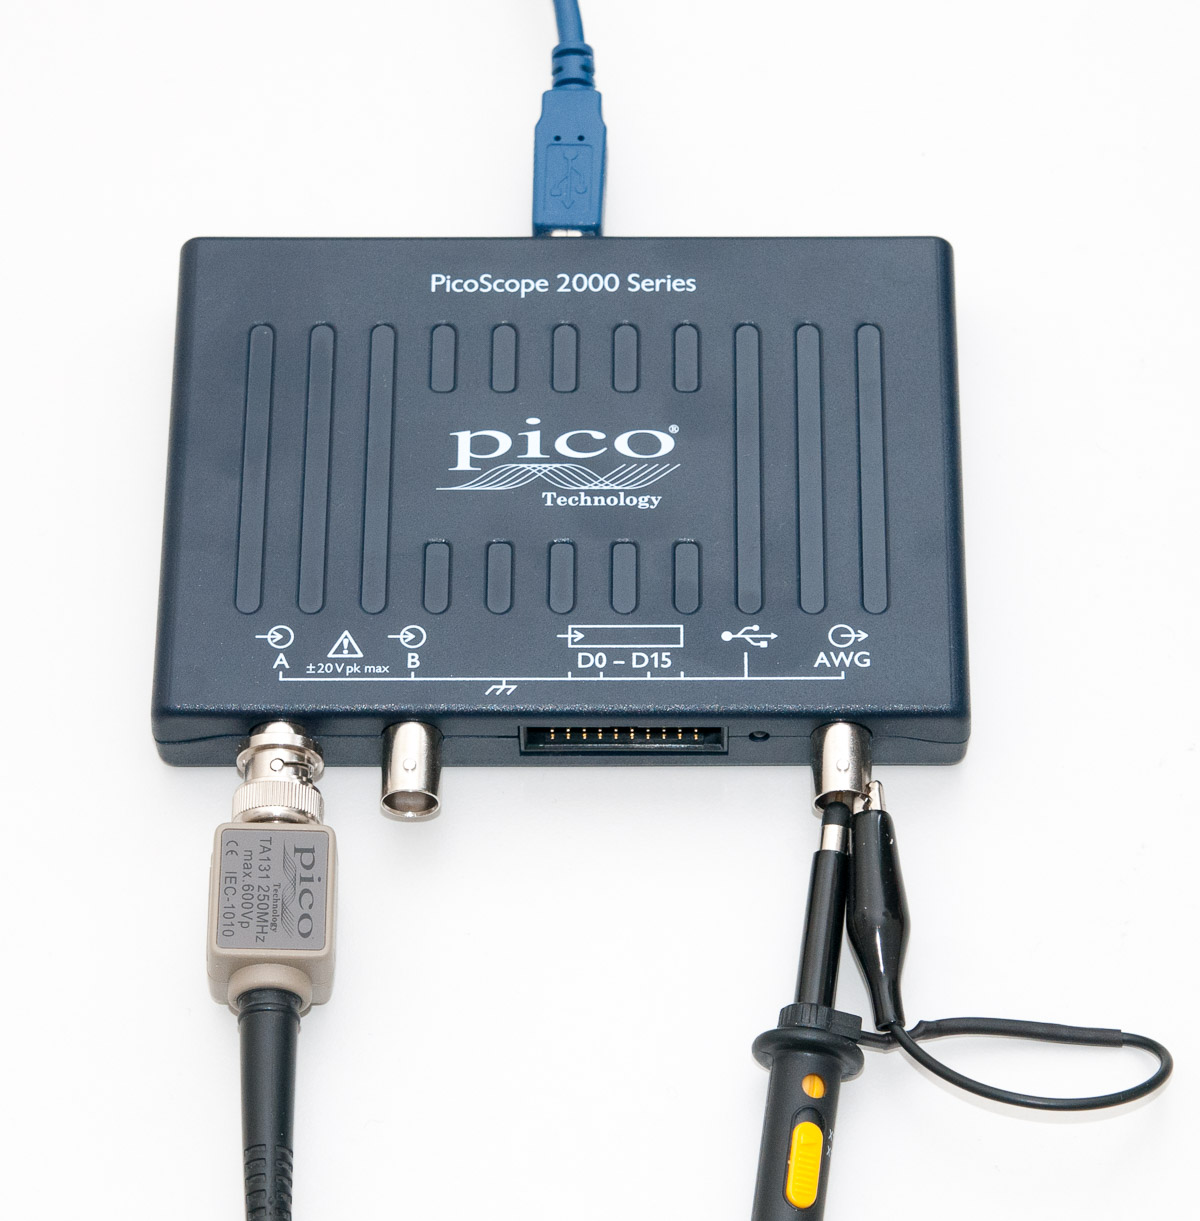
Setup and basic features
The Picoscopes are USB oscilloscopes which mean they don’t have their own display. This means the unit is really compact compared to a desktop scope, and you can use all the real estate on your monitor for analysis, and can easily export any measurement data to a CSV file, take screenshots, etc. Downside naturally is that you need a computer, but since the Picoscope software is available for Windows, Mac and Linux, it doesn’t matter much what kind of setup you run. With a sleek laptop, you have a portable scope setup that will be more versatile, smaller, and lighter than most desktop scopes. Setup is dead simple:
- Install software.
- Plug USB cable in.
- Launch Picoscope software.
- Attach probes and start measuring.
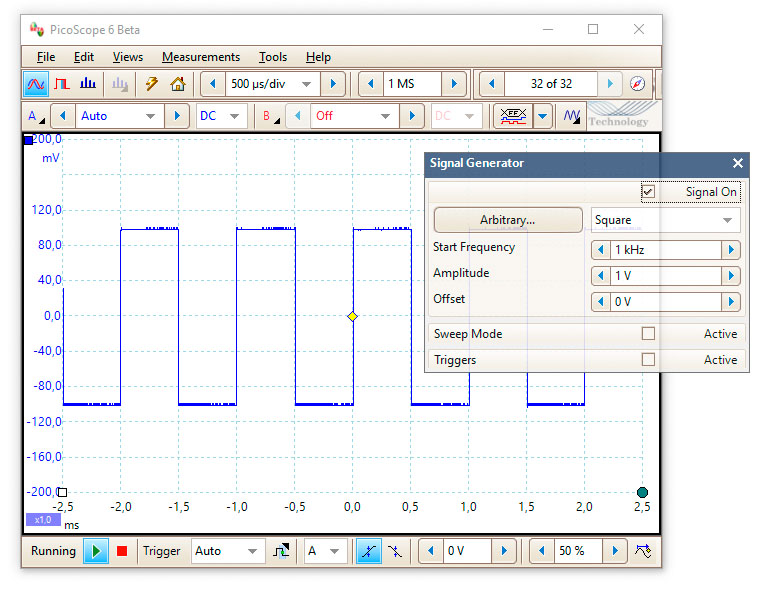
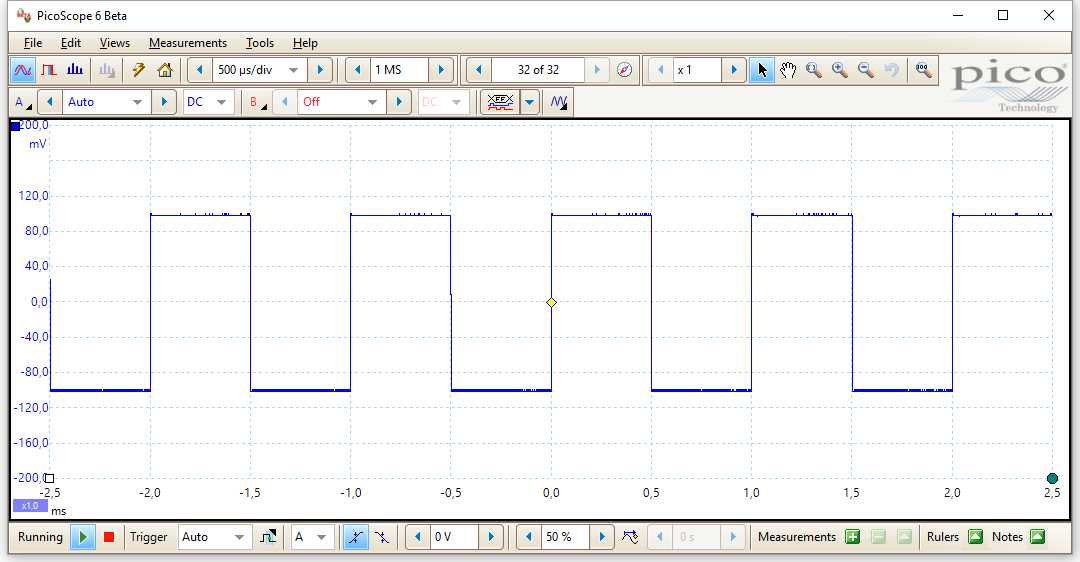
When taking the probes into use, you should first calibrate them. This is very easy since all new 2000 series models have Arbitary Waveform Generator (AWG). It can generate sine waves, square waves, etc., and you can even load your own waveforms and repeat them. Great for testing, easy for calibration: Just click on the AWG button on toolbar (looks like a triangle wave), click a checkbox and you’re good to go. With a 1 kHz square wave, you just adjust the screw in the probe until the wave is square and there is no ringing or round edges in the signal:
After calibration, you can start measuring anything you want. Probes have a 1:10 attenuation switch so signals up to 200 V can be measured — so most anything digital, for mains work you’ll need another set of probes.
The software is very intuitive to use and you can actually try it out in demo mode even without a scope to get a feel of it. The new beta software seems to have gotten nice push buttons for adjusting most settings up and down, so new Windows laptops with touchscreens will work really well, but I like the mouse operation also. In preferences, you can also tailor extensive keyboard shortcuts, so regardless of your preferred method of computer operation, you’re well covered.
Standard oscilloscope operation
The normal mode user interface centers around large view of the signal, as it should. Here are some things you can quickly adjust using the controls around the screen:
Time base: Anything from 1 ns/div to 5000 s/div (div means the dashed vertical dividers)
Number of samples: From 50 samples to 2 GS (gigasamples). This governs how many samples are captured per waveform. This is naturally limited by sample memory of the device, so to get to MS (megasample) region you’ll need an 2206 model or above. The sample number affects how much you can zoom in on a capture — a really useful function by the way, and extremely easy to operate on a desktop application.
Even the entry-level 2204 with 8 kS memory will let you zoom in 4x on a full HD display at fullscreen, and most models get much beoynd those amounts: With the high-memory models (2206 and up) you can actually do amazing things like capture a few seconds of low-speed USB traffic at 32 MS and zoom in until you see the individual bits of 1.5 Mbit transmissions. It also means you can be quite free with your time settings and still be able to zoom in to see a detail you’re interested in. The large buffer is also what enabled the realtime composite video decoding hack on my Picoscope.
Capture number: The software automatically stores 32 latest captures (by default, you can adjust it upwards in preferences as muc) for you to view. I mostly use this when I set large time base like 1 second and need to fiddle with some device to press a button, so I can then stop the capture and rewind a few captures back where the action occurred.
Zoom: You can zoom in, out, select area to zoom by dragging, change zoom level, pan, etc. It’s a PC software so everything works much like you expect.
Channel controls: You can turn analog channels on and off, set their voltage level from +-20 mV to +-20 V, and voltage type to DC or AC (never used that one). For MSO models you can also turn on the digital logic section (with logic level settings behind the dropdown).
You should note the ground in Picoscope is the USB ground, so there are limitations what you can measure with stock probes. I mostly take my projects’ power from USB, so I just use the same powered USB hub for the scope and the project and all goes well. But when you have self-powered unit, you may want to measure the difference in ground levels of your device and the scope, there is usually a dozen millivolts of ground potential difference between your PC’s USB ground and random external device. Most power supplies in hobby use are not grounded and their ground is kind of floating so you should be fine, but dealing with high voltage or exotic equipment, you need a USB ground isolator or differential probes. Well, enough about that, back to features…
Triggering: You can set triggering on rising edge, falling edge, do delayed triggers, and have single triggers, repeating triggers, you name it. In the trigger settings dialog, you can customize the trigger to to simple and advanced edge triggering, trigger on pulse width, interval, level dropout, etc.
Measurements: This is a really nice feature, you can just click the plus sign to add automatic measurements on your signal, like frequency, duty cycle, fall time, etc. that are displayed and updated realtime under your signal view. Really handy when working with new signals.
Views menu: The views menu offers extensive customization for the main view, you can create a grid, add new scope view, customize which channels are shown in each of the views, etc. So you can have a 2×2 grid with one box showing analog channels A and B, another with spectrum analysis, a third having an XY view of the channels, and a fourth showing some MSO signals:
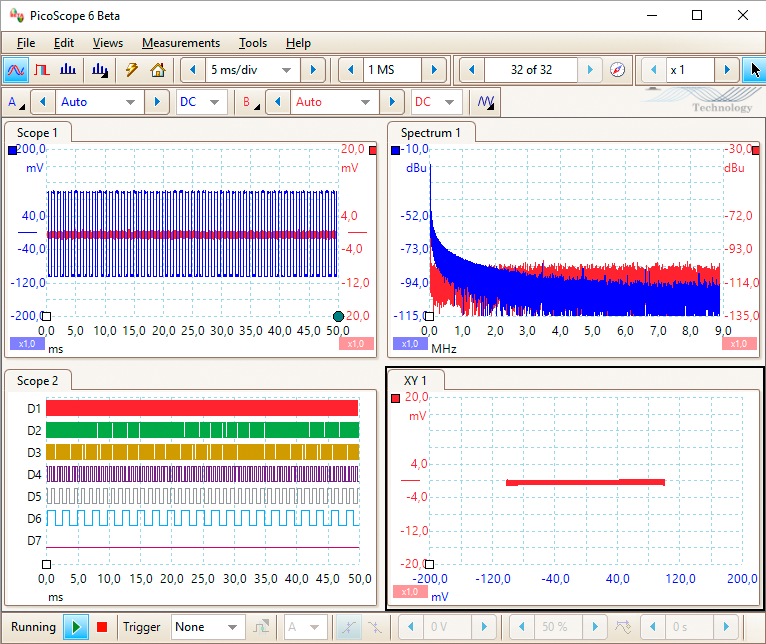
The level of customization is vast and easily beyond what you could expect from any standalone oscilloscope unit.
Tools: In addition to standard operations, you have several powerful features that you may find in high-end scopes:
- Math Channels allow you to use values in scope channels and make calculated channel like 1/A or A*B, or maybe a more common operation of differential channel A-B. But you can even do integration, derivation, exponentiation and trigonometric operations here. I suggest you to explore the Picoscope software demo mode if you want to find out more, it’s a really powerful set of functionality.
- Reference waveforms, just like the name implies, allows you to display a reference sine wave or another waveform with your measurement to compare with the signal you’re measuring.
- Serial decoding is a very powerful feature, allowing you to decode a dozen serial protocols in realtime. More about this below!
- Alarms lets you set up for example a beep alarm when a capture is done, buffers fill or mask fail (see masks below). You can also run an external application, so you could do automation based on this feature.
- Masks lets you create or load waveform masks to check if a measured signal is within a specification. I haven’t used this much, but if you need this feature, I’m sure you know more of it’s usefulness. :)
Persistence mode
This mode is quite similar to normal measurement view, but instead of clearing the window on redraw, previous measurements slowly fade off, very much like on an analog scope with a CRT display. On digital, you can customize the view quite a bit, of course. The view is useful to see variance in a signal. Here’s a sine wave from the AWG:

Signal is quite steady. But if we take an Arduino doing pin strobing with digitalWrite:
void loop() {
  digitalWrite(13, HIGH);
  digitalWrite(13, LOW);
}
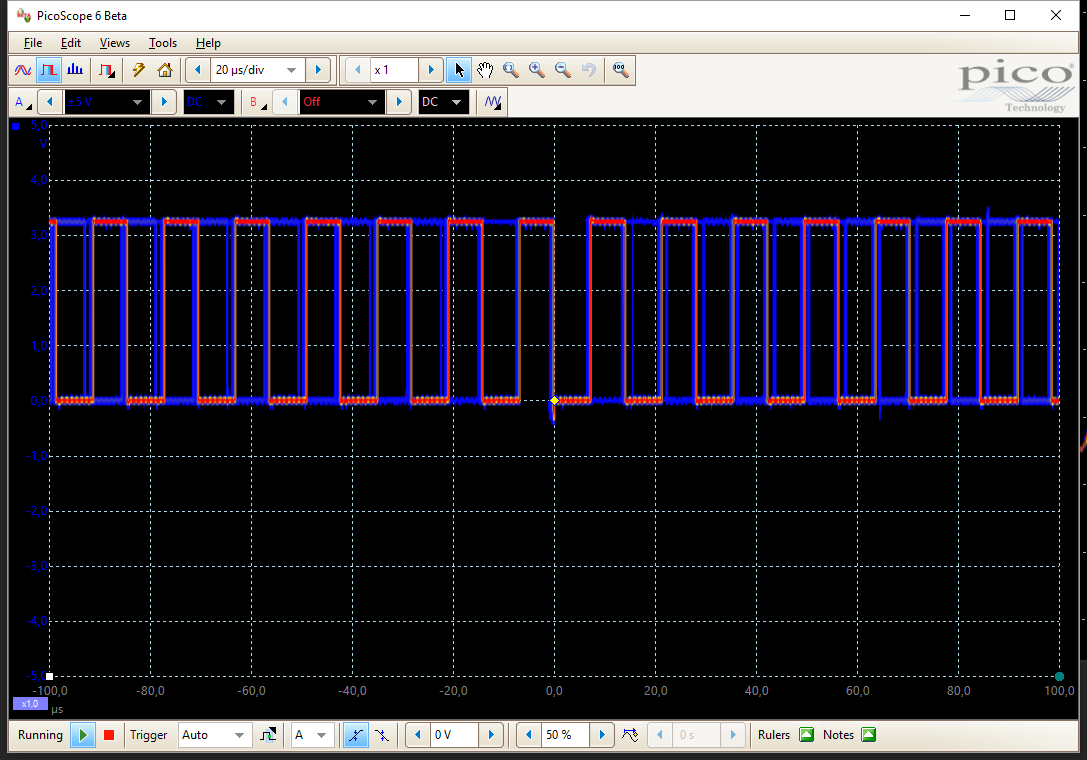
We can immediately see that from time to time, there is a an additional delay after a toggle, causing blue shadow square waves to apprear behind the brighter red one.
Spectrum analysis
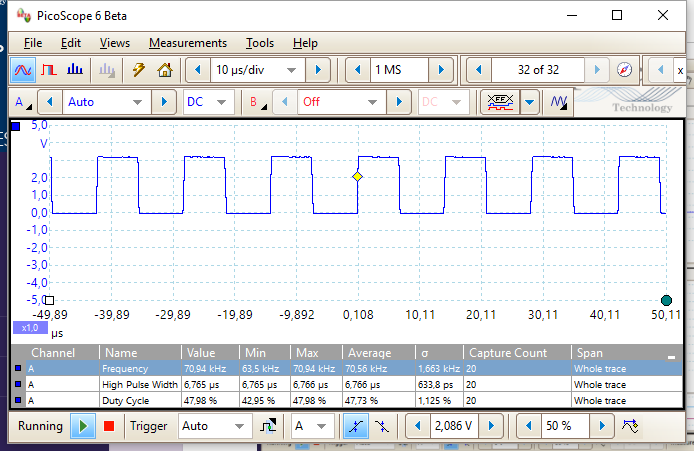
In addition to time-based view of signals, the Picoscope software offers comprehensive spectrum analysis capabilities. With one click, you can enter a spectrum analysis mode and customize it to your liking, selecting linear and logarithmic views, number of spectrum bins, frequency range, and the window function (Blackman, Gaussian, Triangular, Hamming, etc.). Here is a 10 kHz square wave with Blackman windowing and 4 096 bins, average measurement (averages out consecutive measurements):
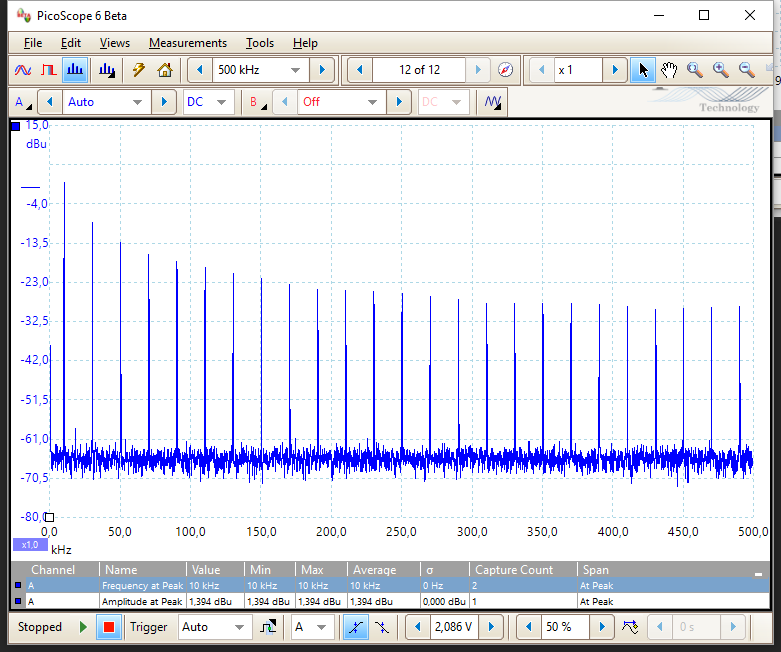
As you can see in the bottom of the screen, you can add (realtime updating) measurements also to this view. Most of my projects don’t involve much spectrum analysis, but in case you ever need it, you’ll not be disappointed by the options available.
Serial Decoding
I do quite little analog work in my hobby projects, and instead spend countless hours learning a new communication protocols like SPI for communicating with a SD card, or MIDI to make a USB adapter for my piano. So easily the most powerful feature of the Picoscope software is its advanced serial analysis capability.
With even the most basic 2-channel 10 MHz model (2204), you’ll be able to decode I2C, serial, and several other serial protocols. You can even do SPI to one direction, as from the MOSI/MISO/SCL/CS signals the circuit select is usually quite optional, so you can plug one channel to clock, and other to either device-host (MISO, master-in-slave-out) or host-device (MOSI, master-out-slave-in) wire. Let’s take this simple Arduino sketch as an example:
int ch='a';

void setup() {
  Serial.begin(9600);
}

void loop() {
  ch = (ch=='z') ? 'a' : ch+1;
  Serial.write(ch);
  delay(10);
}
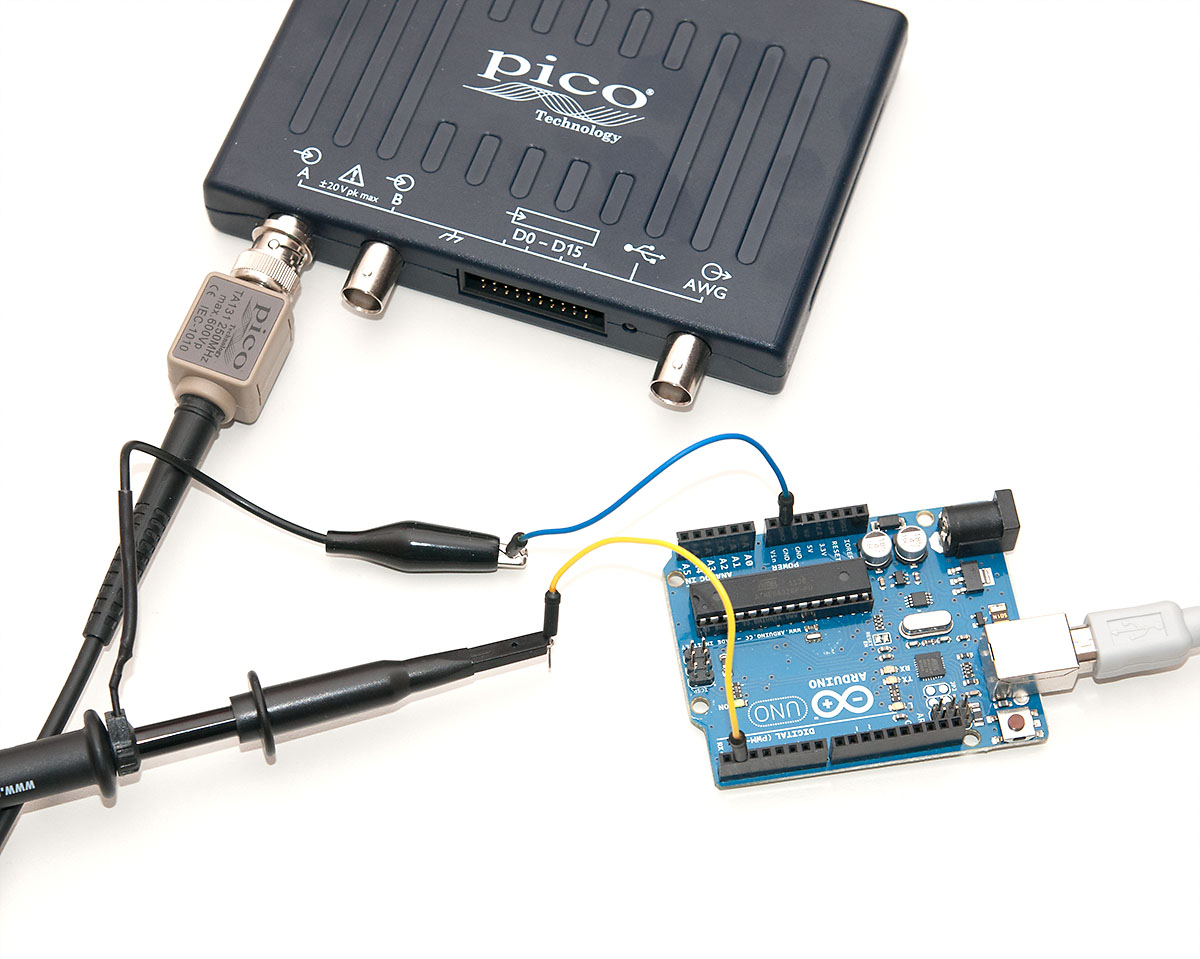
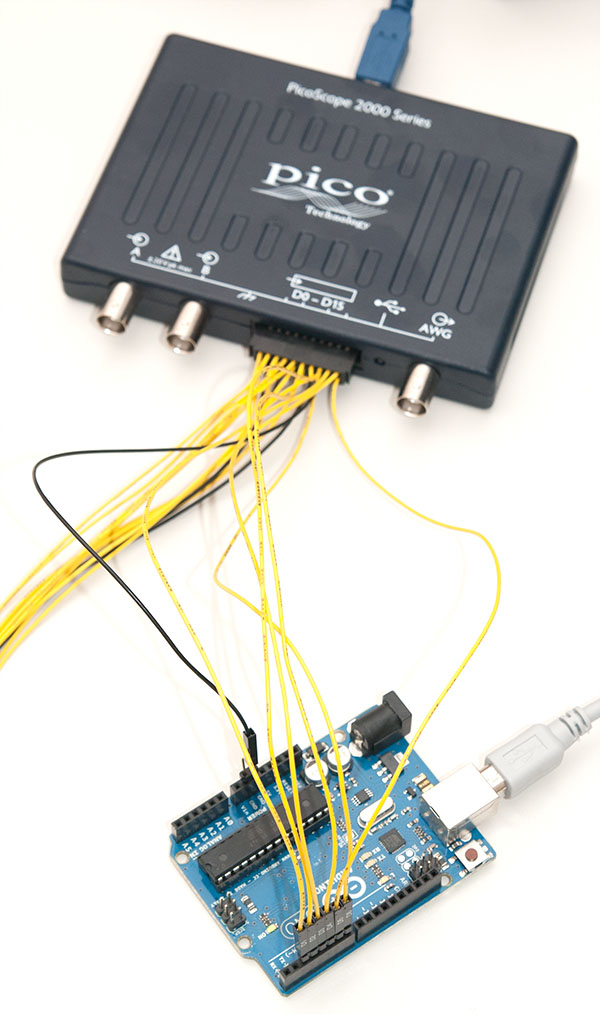
It should output abc...xyzabc... to serial TX pin (pin 1) or the Arduino board. Let’s wire the Arduino to Picoscope:
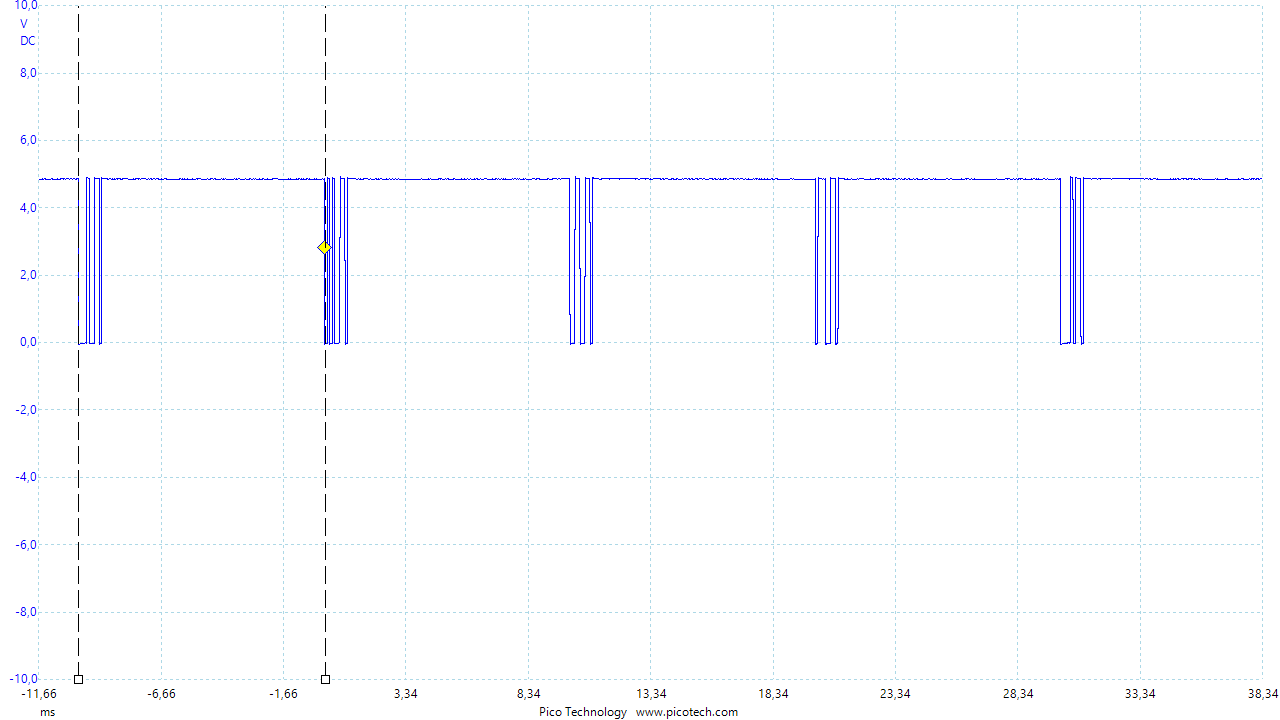
We can immediately see that some data seems to be flowing every 10ms, just as it should:
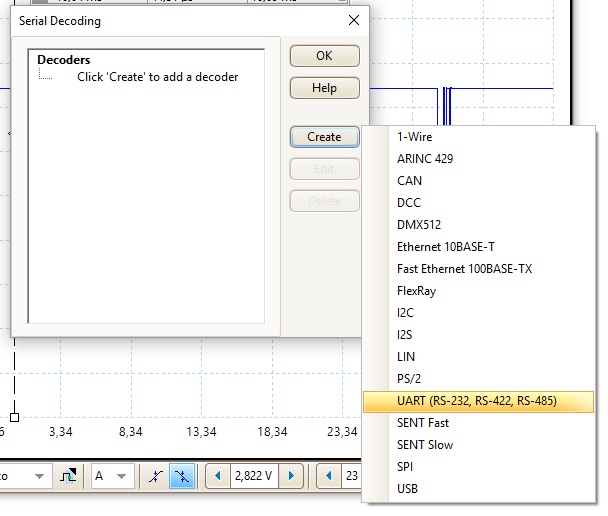
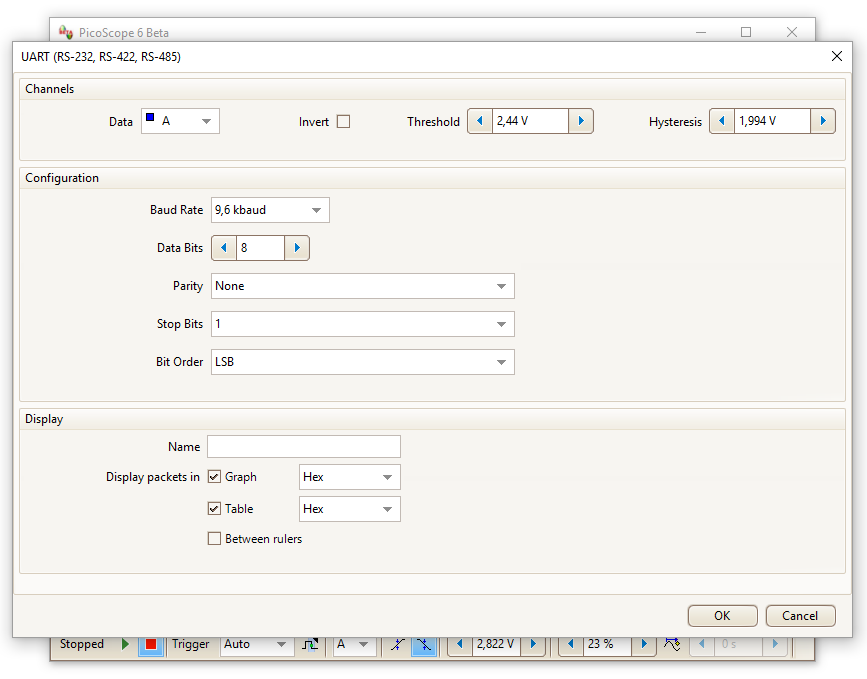
Let’s decode that! Just select Tools .. Serial decoding .. Create and pick the “UART” option from different decoders available. Then on the UART options dialog, we select the data channel (A) and I think the software actually autodetects most likely baud rate and other settings for us:
After clicking OK, the decoded serial data appears below the signal (here you see only the first hex because we’re quite zoomed out). And what’s even nicer, we get a packet view in it’s own pane below the signal, where we can easily verify everything is working just as it should. Voilá!
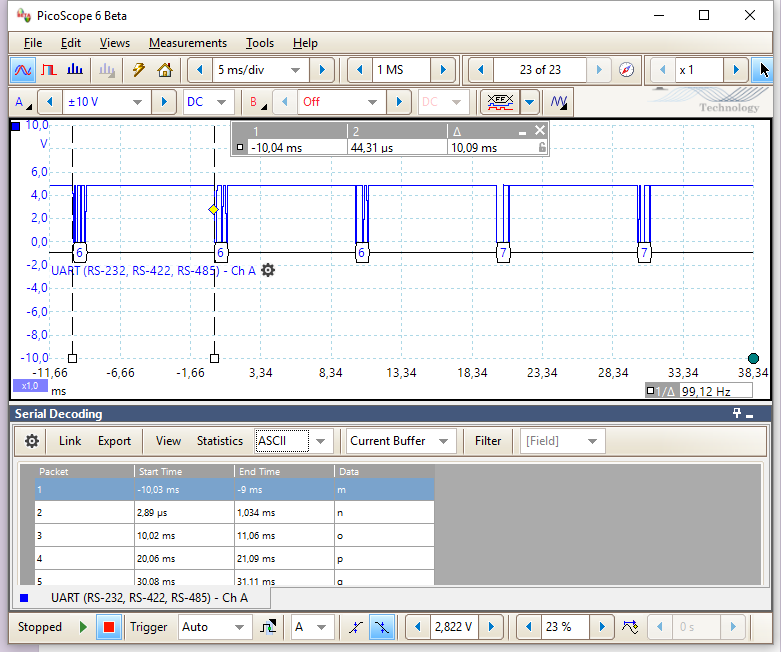
You can of course export the decoded data easily to disk, because this is a PC scope. And you can do all kinds of filtering and sorting as well if you need that. The serial decoding is a extremely powerful feature and maybe worth it’s own article later, and one if I have used quite a lot in the past years.
Mixed Signal Oscilloscope (MSO) functionality
The oscilloscope, spectrum analyzer and serial decoding features along with the extras already build up into quite extensive feature set, but the 2208B MSO model I received for review does not stop there. It adds a 20-pin connector with 4 ground wires and 16 digital pins to the mix. Essentially you get an oscilloscope and a logic analyzer in one compact package. To enable the digital part, you just click on the mixed-signal icon on the software to get a dialog where you can set desired logic levels and enable channels and group them as you like:
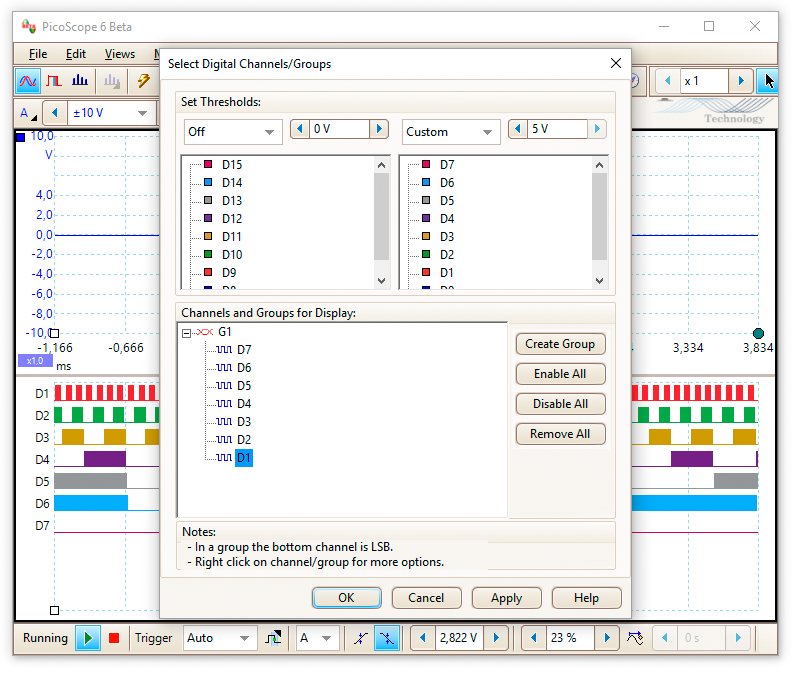
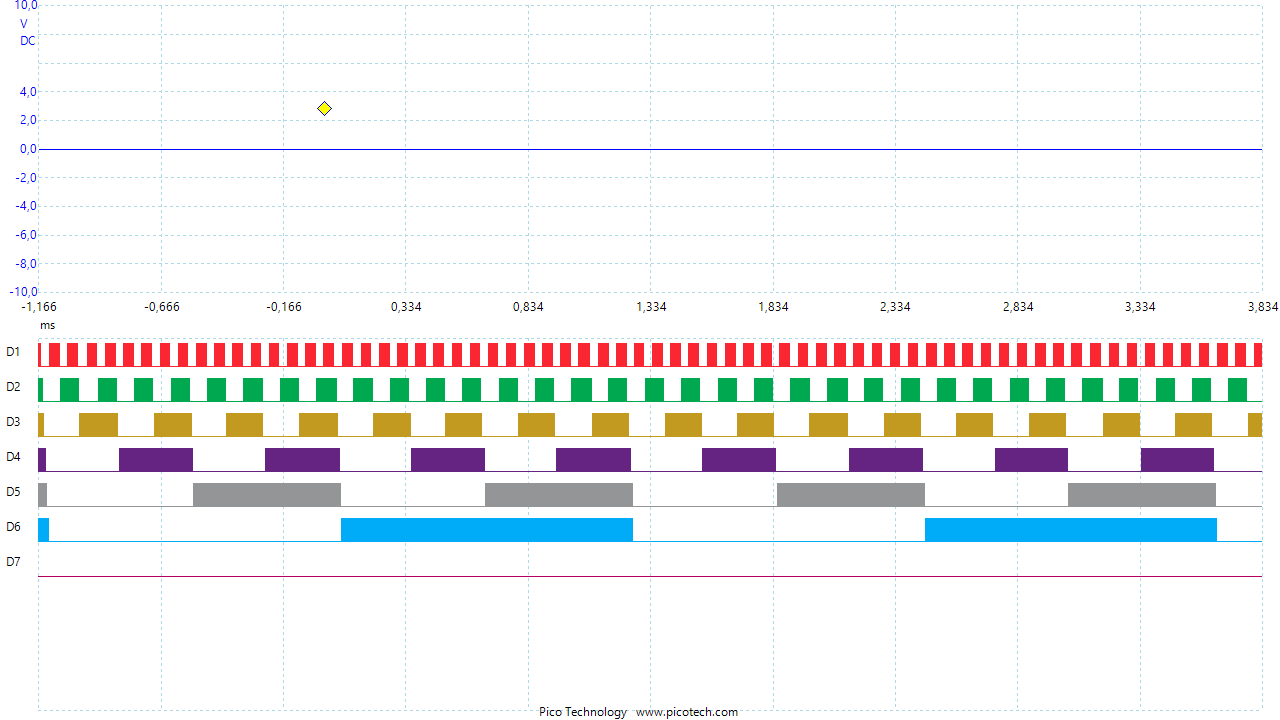
The digital signals are displayed in their own pane. Here’s just a simple parallel test signal coming from an arduino sketch, but you can add serial decoders on any of the channels, so you could analyze half a dozen serial signals, a couple of SPI ones and maybe some analog signals at the same time!
Summary and Conclusions
The new Picoscope 2000 series scopes are a significant upgrade over the older models. Now all versions sport the arbitary waveform generator, hardware sizes are much more compact (and the Picotech blue has become darker and more attractive :), and higher end models in the 2000 line have large sample buffers like earlier only 3000 series and up had, which make them very powerful. The 4-channel and MSO options are also nice to see in the entry-level series, although there is a notable price increase to get either of them.
While the scopes have top notch hardware and high quality probes and feature set, I think what really sets the Picotech products apart is the software. They have a single version of software with the same features for their 109 € entry level 2204 scope and 6 295 € top level 6404D model. This means you get professional caliber measurement software (for Windows, Mac and Linux, I have to add) from ground up, and if you ever run out of bandwith, channels or other features in the 2000 series, upgrade path is simple and there’s no learning curve. I also think Picotech has done really great job at keeping the software at the same time very easy to use, but hiding a ton of great features under the hood.
A review wouldn’t be much without a “Pros and Cons” list, so here it comes. I have to admit I like the Picoscopes quite a lot, but I’ve tried my best to note their biggest drawbacks as well:
Pros
- Extremely capable and easy to use Picoscope software
- Very high quality, sturdy yet compact build
- Very inexpensive entry price point of 139 € (2204 with probes)
- Great price/performance ratio throughout the 2000 series for serious amateur hobbyist
- PC-connected scope is ideal for large views of signals, simple operation with mouse or touch screen, and easy exporting of data
- Serial decoding feature is really useful, and powerful
- Spectrum analyzer, math channels and other extras like the arbitary waveform generator
- Software development kit (SDK) for integration with Matlab, C, C++, and others
- MSO option (2205 and up) and large buffer (2206 and up) offer even more versatility
- A 2000 series scope, probes and a laptop makes for an extremely compact measurement unit
- Five year warranty
Cons
- Operates on USB ground, so you have to be careful with exotic equipment and possibly get differential probes for certain use cases
- Only 8-bit resolution in 2000 series (although it can be boosted to 12 bit with repeating signals)
- Higher end 2000 series models with MSO or 4 channels come close to 1000 euro in price. For the features this is very reasonable, but definitely more than some standalone Rigol scopes or “some USB scope from Ebay” cost
- Lower end 2000 series models have limited sample buffer, so you either have to keep your captures reasonably short, or are limited by the 1 MS/s streaming speed (enough for 100 kHz signals)
- Needs a computer, so if you are working in a garage, you’ll need a laptop
Closing words
I hope you got a heavy dose of Picoscope knowledge with this read! Based on my test run of the 2208B, I think I’ve found my new favorite Picoscope so far. It doesn’t have four analog channels and 16 bit resolution like the 5444B I’ve been using for past years, and maybe has a bit less bandwith and buffer, but it’s eight times smaller and with MSO has all the feature’s I’ll ever be able to use. So the scope easily gets a highly recommended marks from me.
Thank you for reading the review. If you want to know more or order one of these, now would be a good point to head to Picotech’s site to learn more.
You can also check out my earlier reviews of Picoscope Linux software (it was then still in early beta, I think Linux and OS X versions are nowadays quite similar to the Windows version) and Picoscope 3206B review. If you have any questions or want to comment on the review, feel free to drop those in the comments section, I’ll do my best to answer them!
5 comments
Joe Biden:
Nice review! I would like this scope also, but i am bit scared due the equipment wide common GND to damage my computer as well, in situations i accidently short cut high-current sources or high-voltage. For example, many devices under test have a AC power supply, etc. Any tips to avoid damage of the measurement equipment? Better they would isolated the PC/laptop from the scope by optical USB-bridge…
Joonas Pihlajamaa:
Thanks! And great to have you posting on the blog Mr. Vice President!
USB might have some basic electric protection in itself, I usually double-check with multimeter the voltage differences before grounding my probes. If you want to be double sure, you might want to take a look at an isolated USB hub or similar USB isolator (or differential probes from Picotech):
https://www.picotech.com/support/topic2641.html
This looks cool but is unfortunately not USB high speed: https://www.adafruit.com/product/2107
Joe Biden:
Good tip and interesting! I didnt know this exist, though the picoscope may be more expensive than the PC. 2 Years ago i accidently touched +12 V of a car battery with the GND clamp of the probe. And i didnt know, but the oscilloscope was grounded somehow with the copper plate i did the tests on. Then the 10 cm GND wire start to smoke and looked quite pity afterwards. Thankfully the scope didnt got damaged. That made me think. But i reconized, picoscope has only +/-20 Volts peak on its inputs allowed. Differential propbes may be another option here worth considering.
JA:
Thank you for publishing such a detailed review. I am looking at a few different scopes for a current project, and you review gives me confidence that a Picoscope MSO would be a good choice.
JA:
What did you decide to do? Could you use a laptop running off of the battery, which would be an isolated power supply?