$6 DIY bluetooth sheet music page turn pedal with ESP32
I've had an iPad Pro 12.9" for some time, and been happily using it for sheet music when playing the piano. However, having to interrupt your playing to swipe to the next page does get annoying. You can get a $100 commercial AirTurn pedal, but since one can get a microcontroller from Ebay/Aliexpress for $4 and a simple foot pedal switch for $2, I thought it would be a fun one evening hacking project. It turned out quite nice:
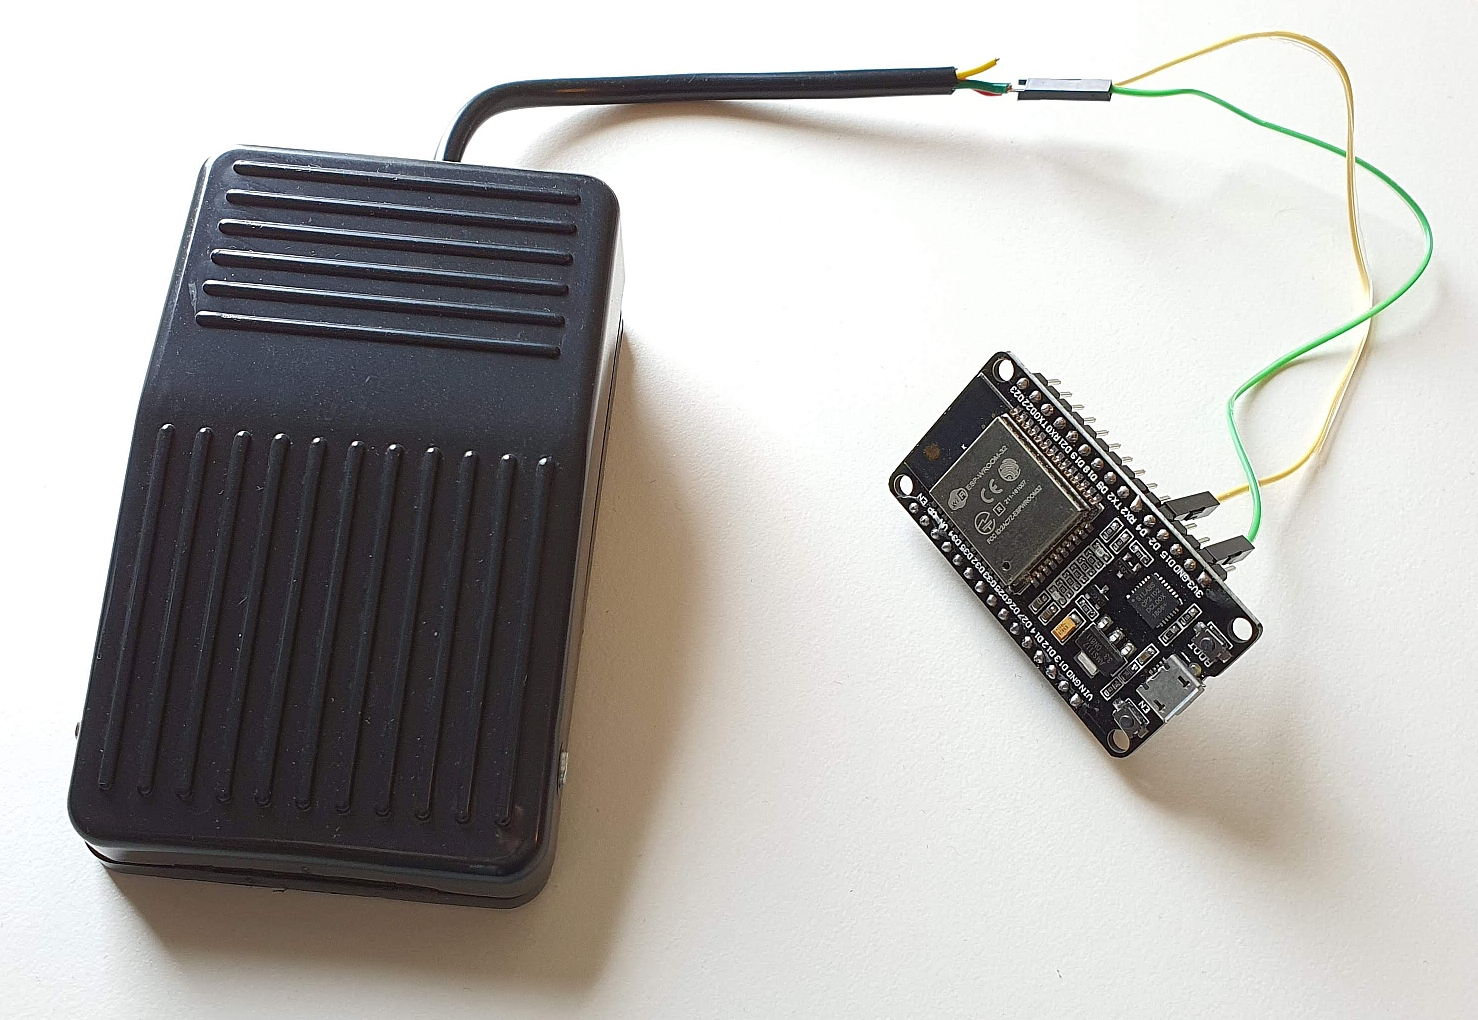
Getting started: ESP32 devkit
The sheet music applications on iPad (and Android) usually have bluetooth keyboard support, turning the page when user presses an arrow key or spacebar. So the minimum viable product is just a bluetooth-enabled microcontroller that can pair with the iPad and send a single key upon request.
The ESP32 chip has both WiFi and Bluetooth, and I chose it for this project, as it is readily available in a compact form factor, and it's easy to program with Arduino. Searching [AliExpress](https://www.aliexpress.com for ESP32 should give you plenty of options.
I had a ESP32 board labelled with "ESP32 DEVKITV1" in my parts box, and it was quite easy to set up with this ESP32 tutorial:
- Install the driver for USB-UART bridge
- Add source URLs for ESP32 to Arduino and install ESP32 support
- Select "DOIT ESP32 DEVKIT" from the board menu
- Hold down "Boot" button on the board while selecting "Upload", release when the console says "Connecting..."
Before you proceed with the tutorial, check that you can get the lights blinking or flash some other example code successfully for the board. There are plenty of resources around if you hit into any issues! I had to google the step 4 myself, although it would have sufficed to read the linked tutorial carefully...
Bluetooth (BLE) keyboard with ESP32
Implementing Bluetooth Low Energy keyboard with ESP32 is quite easy with the ESP32-BLE-Keyboard library. Just follow the instructions of the library (download a release, install .zip library to Arduino) and flash the sample code to the chip.
Note: The example distributed with the library sends some text
and ctrl-alt-del once the device is paired. You may want to
comment out the last bit, and have cursor focus on an empty
notepad window when you pair the device. When developing keyboard
code, you may want to think ahead a bit to avoid situations, where
malfunctioning device (maybe you forget the delay) spams your
O/S with stuff that interrupts any attempts to reflash your device.
Thankfully with bluetooth, you can usually unpair the keyboard, and
then reflash with USB. It's a more irritating problem with USB
keyboard devices.
I modified the sample code a bit to use pin 4 as a "button" (weak
pullup, short to GND the press "down" the button),
and counting fragments of a second the button is down. Upon button
release, the code will send either KEY_RIGHT_ARROW or KEY_LEFT_ARROW,
depending whether the button was briefly down (50-500ms) or longer.
This lets you briefly tap the pedal to turn to next page, or hold
the pedal a sec and release to turn to previous page:
#include <BleKeyboard.h>

// shorter 15 character name seems to work better w. iPad
BleKeyboard bleKeyboard("ESP32-Keyboard2", "Me", 100);

#define BUTTON_PIN 4

void setup() {
  pinMode(BUTTON_PIN, INPUT_PULLUP);
  Serial.begin(115200);
  Serial.println("Starting BLE work!");
  bleKeyboard.begin();
}

void loop() {
  static int debug = 0, counter = 0;
  char button = digitalRead(BUTTON_PIN) == LOW;

  if(button) counter++;

  if(bleKeyboard.isConnected() && !button && counter > 1) {
    Serial.println(counter);

    bleKeyboard.write(counter < 10 ? KEY_RIGHT_ARROW : KEY_LEFT_ARROW);
    delay(100);
    bleKeyboard.releaseAll();

    counter = 0;
  }

  if(++debug % 20 == 0) Serial.println("sec");
  delay(50);
}
As you notice, there are some debug statements being sent over serial. You
could remove those lines if you want to have even shorter code. The static int definition in the beginning of loop() means the variable keeps its state
between calls, so previous values of debug and counter remain.
There shouldn't be nothing too complicated here.
To try it out, flash the code to ESP32, pair your computer with "ESP-Keyboard2"
use for example a jumper cable to short pin 4 and GND. Short periods should
move your cursor right, longer left (and really short ones, they don't do
anything at all ;).
Connecting to a pedal
This is the ridiculously easy part of the project: Use a pocket knife
or some other tool to uncover the wires from your pedal (or other
button of choice), and connect the wires between pin 4 and GND.
In the project image, I've just stuck jumper wire into the cables,
but soldering the stuff in and having an enclosure for the ESP32
would be a good solution. The ESP32 is unfortunately a bit too big to
fit into this pedal!
I used a USB battery pack to power the project, but my Kawai digital piano's memory stick port will happily provide the ~200 mA required by the board as well. Pair with your iPad, and pedal away!