Use ChatGPT with golang and SvelteKit GUI, including GPT4
OpenAI came out with ChatGPT, and wow, that is quite something. What is also remarkable is the load the ChatGPT client is under, and how often it is "experiencing high demand". Or just requires you to prove you are human and log in again.
You can get ChatGPT Plus for $20 a month, but hey, you can also get chat experience for $0.002 per 1000 tokens. To hit that monthly fee, you need to use 10 M tokens, which is not that far from 10 M words. That is pretty heavy use...
Using OpenAI ChatGPT (gpt-3.5-turbo) through Python API
To use the ChatGPT API, at its simplest form with Python3 you just pip install openai and create a short script:
#!/usr/bin/python3

import openai
import sys

openai.api_key = 'sk-yourkeyhere'

if len(sys.argv) < 2:
    prompt = input('Prompt: ')
else:
    prompt = ' '.join(sys.argv[1:])

resp = openai.ChatCompletion.create(
  model="gpt-3.5-turbo",
  messages=[
        {"role": "system", "content": "You are a programming expert giving advice to a colleague."},
        {"role": "user", "content": prompt}
    ]
)

print(resp['choices'][0]['message']['content'])

print('Usage was', resp['usage'])
You need to create credentials at OpenAI platform, enter your credit card and set a warning and hard treshold for monthly billing (I set mine to $4 and $10, respectively). But after filling your API key to the script, you can just run it:
$ python3 chat.py What is the capital of Alaska
The capital of Alaska is Juneau. However, I believe you were looking for programming advice. What specifically are you working on and what kind of advice are you seeking?
Usage was {
  "completion_tokens": 34,
  "prompt_tokens": 30,
  "total_tokens": 64
}
Now that is pretty nice, but we can do better!
Golang client with SvelteKit frontend
In my previous Golang+SvelteKit GUI post I explored how to create a Go application acting as a web server and making a user interface with SvelteKit:
- Golang has high performance and excellent set of libraries to accomplish many tasks
- Cross-platform support out of the box with compact executables
- SvelteKit is fast to develop as a frontend, requiring very low amount of code for rich interactive UIs
OpenAI does not produce it's own Go library, but that API as well documented and shabaronov has made an excellent Golang OpenAI API library that makes calling the API simple. It even supports GPT4, so if you have access to that, you can create a GPT4 chat client as well.
Without further ado, here's the Github repository for my GoChatGPT client. You can basically git clone://github.com/jokkebk/gochatgpt and follow the instructions in README.md to get it running, it's about 4 commands all in all.
Let's look a bit what the code does!
Golang ChatGPT Backend
Main method of the backend is nothing too complex:
- Serve the SvelteKit GUI from
staticfolder (includingindex.htmlwhen user requests/). - Have a chat endpoint at
/chatthat takes a JSON object with chat messages and passes it to OpenAI API. - Return the OpenAI [ChatGPT] response as a string to calling client.
func main() {
	// Get the API key from the environment variable OPENAI_API_KEY
	apiKey := os.Getenv("OPENAI_API_KEY")
	client := openai.NewClient(apiKey)

	http.Handle("/", http.FileServer(http.Dir("static")))
	http.HandleFunc("/chat", func(w http.ResponseWriter, r *http.Request) {
		var messages []openai.ChatCompletionMessage
		err := json.NewDecoder(r.Body).Decode(&messages)
		if err != nil {
			http.Error(w, err.Error(), http.StatusBadRequest)
			return
		}

		ans, shouldReturn := chatGPT(client, messages)
		if shouldReturn {
			http.Error(w, "ChatGPT error", http.StatusBadRequest)
			return
		}
		// Serialize the response as JSON and write it back to the client
		w.Header().Set("Content-Type", "text/plain")
		w.Write([]byte(ans))
	})

	address := "localhost:1234"
	log.Printf("Starting server, go to http://%s/ to try it out!", address)
	http.ListenAndServe(address, nil)
}
With the rather straightforward OpenAI, the chatGPT() function is nothing to write home about either – we get the chat messages, put them into ChatCompletion object, pass
to API and (hopefully) return the top answer (or an empty error if it failed):
func chatGPT(client *openai.Client, messages []openai.ChatCompletionMessage) (string, bool) {
	resp, err := client.CreateChatCompletion(
		context.Background(),
		openai.ChatCompletionRequest{
			Model:    openai.GPT3Dot5Turbo,
			Messages: messages,
		},
	)

	if err != nil {
		log.Printf("ChatCompletion error: %v\n", err)
		return "", true
	}

	return resp.Choices[0].Message.Content, false
}
Switching from GPT3dot5Turbo to GPT4 is only a matter of changing exactly that in Model. You can view the full source code at main.go.
SvelteKit frontend
The GUI is made with SvelteKit and it uses @sveltejs/adapter-static to output a static single page web application to svelte-src/build that is symlinked to static at the project root.
Javascript code required for the GUI to work is not too complex. A few notes:
- There are a few
ai_typesdefined that you can use to tailor the type ofsystemrole the chatbot takes (OpenAI API basically starts the chat with asystemmessage specifying this, and the chatbot tries to accomodate whatever is stated there). onMount()is used to focus on the textarea upon page load.- There is a
waitingboolean to show in UI that we're waiting for response. newChat()initializes an empty chatask()does the heavy lifting, initializing a new chat if needed, and then appending latest user question intochatarray (a series ofuserquestions andassistantresponses). We send the chat as JSON to server and add the (string, not JSON) response to chat and return to allowing new questions to be appened.
import { onMount } from 'svelte';
import { marked } from 'marked';

let ai_types = [
    {name: "Coder", value: "You are a programming expert giving advice to a colleague."},
    {name: "Empty", value: ""},
];
let ai_type = ai_types[0].value;
let chat = [], question = '', waiting = false;
let textareaRef;

onMount(() => { textareaRef.focus(); });

function newChat() {
    chat = [];
    chat.push({role: 'system', content: ai_type});
}

function ask() {
    if(chat.length === 0) newChat();
    chat = [...chat, {role: 'user', content: question}];
    question = '';

    // Send the message over AJAX
    let xhr = new XMLHttpRequest();
    xhr.open("POST", "/chat", true);
    xhr.setRequestHeader('Content-Type', 'application/json');
    xhr.send(JSON.stringify(chat));
    waiting = true;
    xhr.onload = function() {
        if (xhr.status != 200) { // analyze HTTP status of the response
            alert(`Error ${xhr.status}: ${xhr.statusText}`); // e.g. 404: Not Found
        } else { // show the result
            chat = [...chat, {role: 'assistant', content: xhr.responseText}];
        }
        waiting = false; // clear the flag to allow further questions
        textareaRef.focus(); // focus on the textarea again
    };
}
With Svelte, the user interface is a joy to write, with some fairly easy to understand logic:
<h1>SvelteKit + Golang ChatGPT client demo</h1>

<p>
<select bind:value={ai_type}>
    {#each ai_types as ai_type}
        <option value={ai_type.value}>{ai_type.name}: {ai_type.value}</option>
    {/each}
</select>
<button on:click={newChat}>Start a new chat</button>
</p>

{#each chat as message}
    <div class={message.role}>
        {@html marked(message.content)}
    </div>
{/each}

{#if waiting}
    <div class="system">Waiting for the answer...</div>
{:else}
    <div class="user">
        <textarea bind:value={question} bind:this={textareaRef}
        on:keypress={e => { if(e.keyCode === 13 && e.ctrlKey) ask(); } }
        placeholder="Type your question here"></textarea>
        <button on:click={ask}>Ask</button>
    </div>
{/if}
Note that the marked library is used to render Markdown returned by ChatGPT into HTML. In addition to the code and HTML, there's a bit of CSS in the +page.svelte to separate the different chat types and make the UI nicer.
Running The Project
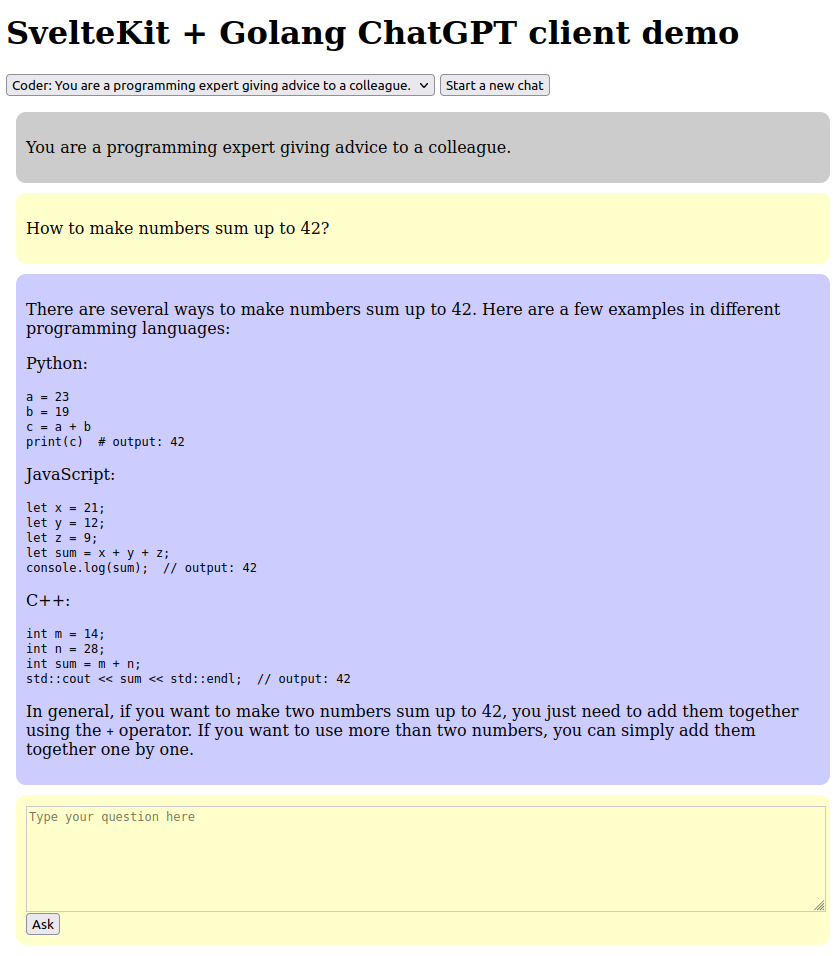
Once you have npm installed and npm run build't the svelte-src, you can set OPENAI_API_KEY to your API key like with the Python version, and go run main.go to launch the server. See the Github repository README.md for details. Chat should now be available at http://localhost:1234/ for your perusal. Here's a sample chat done over the client:
Making the colors less ugly and adopting an actual UI CSS framework or something is left as an exercise to reader. :)
Final remarks
Note that every question sends the whole previous dialogue to OpenAI API, so longer chats start to really tax your token quota. So if a question would be 10 tokens on average and answer would be 240 tokens, consumption would a 5 exchange Q&A would not be 5 * (10+240) but:
- 10+240 for the first Q&A
- 10+240 + 10 for the second question + 240 for the answer
- 10+240 + 10+240 + 10 for the third question + 240 for the answer
- 4 * 250 for the fourth exchange
- 5 * 250 for the fifth exchange
For a total of 1+2+3+4+5 = 25 sets of 250 token uses, i.e. 6,250 tokens! For this reason, I recommend starting a new chat often, especially if you are using the GPT4 backend that is over ten times as expensive as the 3.5 Turbo.