ATtiny2313 Breadboard Header with DipTrace
Sooner or later there comes a point in your electronics career where it would be nice to have a schematic for the project you are doing. If you have a steady hand and lots of paper to spare, the first option is to draw the schematics on paper. However, computer aided design (CAD) software does have it’s advantages, allowing easy modifications, sharing and later PCB creation.
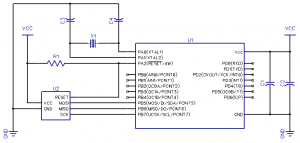
In this short tutorial, I’ll show how to create a simple schematic using DipTrace, an excellent electronics CAD package that has a free version as well as inexpensive entry-level commercial and non-profit licenses. The circuit I’m doing is a simple ATtiny2313 breadboard header that integrates an ISP programming header, a few capacitors, a reset pullup resistor and a clock crystal, eliminating the need to wire these things every time I start a new project. Additionally, I’m showing how to use DipTrace’s powerful facilities to create new components in literally few minutes. Let’s get started!
Why DipTrace and not Eagle CAD (or some other brand)?
The electronics CAD software, the most often recommended software for beginners is Eagle CAD. The main reasons are probably the rather reasonable pricing and large existing userbase. Also, a lot of open hardware projects share their schematics in Eagle format, and many PCB fabrication shops accept Eagle files directly without conversion to Gerber format.
What the recommenders don’t usually mention is that Eagle CAD’s abysmal usability. The user interface paradigms do not follow any usual norms, but are instead likely made up by the first developer of the software somewhere in the nineties. Badly. It is hard to find adequate words to describe how un-intuitive and horrific the UI is to use. The learning curve is steep and doing your first schematics is an exercise in frustration. You supposedly get past the initial shock, much like you would eventually be able to drive a car while being suspended upside down from the ceiling. A car which has its steering wheel replaced with a piano keyboard where low tones steer left and high tones right. A car which does not have a gas pedal, but just a brake and brake inversion button that enables acceleration. And… well, you get the idea (I think I save more inventive car analogies for a separate Eagle UI bashing post).
Compared to Eagle, I’d subjectively rate DipTrace user interface to be about 1300 % better, with these highlights:
- Normal Windows (Linux/Mac) UI paradigms mostly work (dragging objects around, selecting multiple items, etc.
- The part library is rather extensive (maybe not as big as Eagle’s, but see next point)
- Creating new parts is really easy and quick
- Free non-profit version is pin-limited (300 pins, expandable to 500), not PCB size limited
- Inexpensive commercial and non-commercial entry level licenses (starting from 65 €)
- Good tutorials and documentation, easier learning curve
Creating custom parts in DipTrace
The best thing about DipTrace is easily its powerful pattern and component editors, which let you create your own parts you can then use when laying out PCBs (pattern) or doing schematics (component). The second biggest headache in Eagle (after the horrible UI, did I already mention that?) was finding the right components – I was always afraid I wouldn’t find this or that special IC. With DipTrace, I can make a custom ICs in the same time it would take to google for a Eagle part library and install it – assuming I’d find one immediately. For example, it took exactly three minutes to make the pattern and component described below.
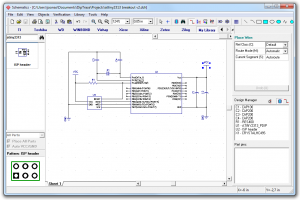
For my ATtiny2313 breadboard project, I decided I’d want to create a new component for the ISP programming header, which would make adding it to subsequent projects easier. First, I fired up the DipTrace “Pattern editor” to create a simple 3×2 pin header:
Note how I change the pad width a bit. You’ll also want to make sure the drill holes for this header to be at least 0.039″, so change that if too if you follow my instructions (it defaults to previously used value, I had already changed mine before)! I also marked the MISO pin by using a square pad – this is the same pin that will be aligned with the red line in the ISP connector cable (6-wire ribbon cable). I also drew a nice rectangle around the header that will appear on the silk layer of the PCB. After I was done, I saved the result to mylib.lib.
To use the ISP header part in schematic capture, I also need to create a “component” out of it – this is the logical representation of the same part, and does not need to look like the actual physical component at all (for example, a quad buffer chip could be represented as four separate symbols you can individually drag around). For my schematic, I chose to use “2-sided IC” type of symbol with VCC and GND pins on the left side, and signal pins on the right side of our “IC”. I also marked the pins as input/output/power pins and made the pin names visible on the part. The whole component creation took just 50 seconds!
DipTrace also lets you easily connect this logical representation used in schematics with the physical representation (“pattern”) used in PCB layout: This is done by assigning a pattern to the component, and then just connecting the component pins to corresponding pattern pins. This is done from 0:50 onwards in the video. After assigning a pattern and connecting the pins, we’re ready to save our component library as mylib.eli.
Schematic capture
Once I had the ISP header done, I was ready to draw the schematic. Using DipTrace Schematic capture is very straightforward, and as you can see, it only took four minutes to draw the complete schematic. However, I do recommend watching the DipTrace guided tour when you’re first getting started! Two helpful hints that’ll speed up your drawing:
- You can use ESC to quickly “back up” from editing a wire to wiring mode, and again back to “normal” mode (cursor key highlighted in toolbar). This is done several times in the video below.
- With a component selected, use spacebar to rotate a part 90 degrees at a time.
For schematics I’m just going to publish in the web I usually just find some component with a suitable symbol and use that – for example, a polarized capacitor. But this time I also wanted to make a PCB from the schematic, so I payed extra attention in selecting a component with suitable pin spacing and silk screen symbol, to make PCB creation easier. The exact parts chosen were:
- Crystals: CRYSTALHC49S
- Discrete: 1 * CAP100 (10 mil spacing for the 10 uF capacitor)
- Discrete: 3 * CAP200 (20 mil spacing for 1 uF tantalum and two 27 pF ceramics for the crystal)
- Discrete: 1 * RES400 (40 mil spacing for pullup resistor)
- Atmel: ATINY2313-PDIP (ATtiny2313 in DIP package)
After recording the schematic capture, I proceeded to add values for capacitors and tidied up a bit. The resulting file is available here: attiny2313_breakout_v2.dch.
Proceed to part 2: Using the PCB layout tool to transform this schematic into a PCB layout

