Raspberry Pi as Arduino HDMI Shield
Merry Christmas to everyone! Today’s hack is something that I’ve been planning to try out for a while: Using the Raspberry Pi as a (relatively inexpensive) “HDMI shield” for the Arduino microcontroller. While the Pi can easily do most things that the Arduino can and usually much more, one might have an otherwise complete project (for example, something related to home theater automation) that would benefit from HDMI output.
Arduino display shields are not the least expensive, so why not use a RaspPi instead? There have been hacks for using RaspPi as network shield, too, and this project is very much like it (actually, you could change the Pi-side code just a bit and have some network-related commands available for your Arduino in no time).
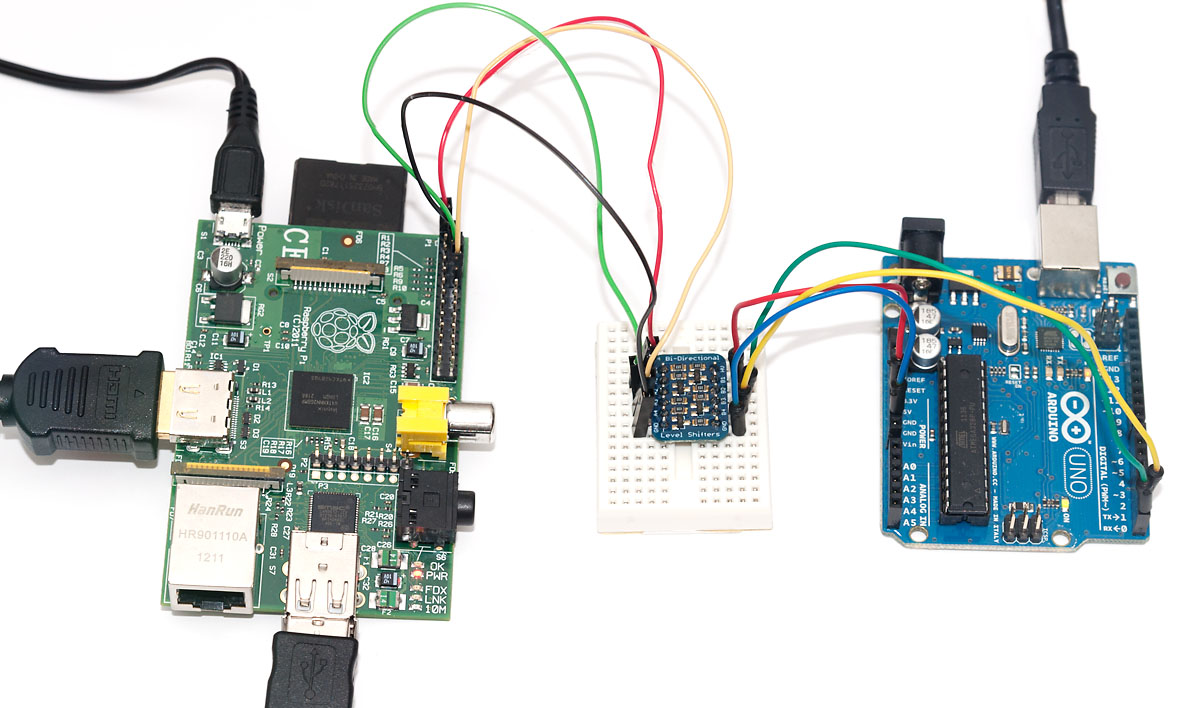
The basic hardware premise for this hack is very straightforward – wire the Pi and Arduino together using the serial interface available on both. Because Pi is 3.3V and Arduino 5V, a level converter is needed – I used one from Adafruit this time, as it’s dead simple to use and doesn’t pose the dangers of overloading Pi like my simple resistor option does (you might, however, check that link out as it contains the pinouts for RaspPi serial pins in the GPIO header).
On software side, the Pi acts as a “server”, taking simple display commands via serial link. You could even start the Pi server script and connect to the serial port with Putty, and the session could look a bit like the following:
# initialize viewport - not actually implemented yet
init 500 500
# draw a 10x10 rectangle at (5,15)
draw 5 15 10 10
# exit the server
exit
The python server uses pyserial for serial communications, currently at 9600 bps, but the Pi and Arduino should be able to do 115 200 as well. For graphics, pygame framework is used. Current version of code initializes a 500×500 pixel graphics viewport, but one could use the parameters given by “init” command from Arduino side to define that, too. The code should be rather straightforward to understand: there are only two supported commands, “draw” with four parameters, and “quit” to exit the otherwise infinite loop waiting for draw commands (I named the file ar2pi.py):
#!/usr/bin/env python

import serial
import string
import pygame

ser = serial.Serial("/dev/ttyAMA0",9600)
ser.open()

pygame.init()
window = pygame.display.set_mode((500, 500))
colour = pygame.Color("blue")
pygame.mouse.set_visible(False)

quit = False

while not quit:
	line = ser.readline()
	words = line.split()

	if words[0] == "rect":
		pygame.draw.rect(window, colour, (int(words[1]),
                                 int(words[2]), int(words[3]), int(words[4])))
	elif words[0] == "exit":
		quit = True

	pygame.display.flip()

ser.close()
Note that as “rect” and “quit” are only codewords recognized and rest are silently ignored, the “#” used for comments in the earlier example don’t cause any harm. To run the Python script, you’ll need to install python-serial and pygame packages using sudo apt-get install pygame python-serial, and then either give the script execution privileges with chmod and use ./ar2pi.py, or just use python ar2pi.py.
Important note: By default, the /dev/ttyAMA0 is bound to a serial terminal on the Pi, so you’ll need to disable that from /etc/inittab and reboot the Pi to free up the serial device (just locate the line that has ttyAMA0 in it and comment it out). See my previous Pi-Arduino post for details.
Arduino-side software to send display commands to Pi
On Arduino side, only a simple sketch is needed then to open the serial line to Pi and send some drawing commands. Note that you cannot upload a sketch to the Arduino while RX pin is connected to the Pi, so you should always remove the jumper wires from TX/RX pins on the Arduino before uploading:
int pos = 0, width = 1;

void setup() {
  Serial.begin(9600); // Initialize serial connection

  // Send initialization command to the "display server" on Pi
  // this feature is not yet implemented on Python-side, though
  Serial.print("init 500 500\\r\\n");
}

// Helper function to send "draw x y w h\\r\\n" -style commands
void draw_rect(int x, int y, int w, int h) {
  Serial.print("rect ");
  Serial.print(x);
  Serial.print(' ');
  Serial.print(y);
  Serial.print(' ');
  Serial.print(w);
  Serial.print(' ');
  Serial.print(h);
  Serial.print("\\r\\n");
}

void loop() {
  int n;

  if(pos + width > 500)
    return; // only print exit once and then stop doing anything

  delay(500); // draw new rectangle every 500 ms
  draw_rect(pos, pos, width, width); // square at (pos, pos)

  pos += width; // increment x & y position
  width++; // increase rectangle width & height

  if(pos + width > 500) // viewport filled now
    Serial.print("exit\\r\\n");
}
Pi HDMI shield in action
Below you can see the short piece of code in action. You can see me pressing enter to start the Python script on Raspberry Pi, and once the display is initialized by pygame (screen goes blank), I push the reset button on Arduino to start running the sketch, which then draws the rectangles. Once the screen is more or less filled, Arduino sends “exit” command to Pi and the Python script terminates, returning us back to terminal:
In its current form, you’ll need to manually start the Python script every time you want to try it out. A more advanced version would be a “display server” that runs continuously and uses the “init” commands to reset the viewport to the wanted size. The commands might also return some status codes. You could even make the server start upon Pi startup, so you wouldn’t need to run it manually at all.
Closing remarks
In this post, I’ve outlined a simple “HDMI server” for the Raspberry Pi that uses pyserial to receive commands over Pi’s serial interface, and pygame to display graphics primitives according to those commands. Furthermore, an Arduino client was written to send these commands to the Pi, drawing a string of blue rectangles to the screen.
For future development, additional commands to include new primitives could be added (circles, lines, pixels, bitmaps), as well as commands to set the drawing color and other parameters. Communication from Pi to Arduino could be added, for example to send display content (“getpixel x y” command) or even mouse events to the Arduino. The commands need not to be limited to display only – the server could as well fetch data from URLs, play sounds, and whatever can be achieved with the Pi (which is quite a lot).
Current framework uses text-based commands, which introduce some lag even with 115 200 baud serial line – an improved version of the framework might offer a binary protocol. The Arduino side code could be encapsulated in a simple-to-use library form, hiding the implementation details from the user. I may add these ones later, but anyone is free to continue from the current codebase – all the above code is hereby put into public domain.