Code and Life

Programming, electronics and other cool tech stuff

Supported by

Supported by Picotech

AVR ATtiny USB Tutorial Part 1

I wanted to build an USB device using AVR microcontrollers since I found out that it was possible. However, both the USBtiny project and the more extensive V-USB library lacked an easy-to-approach tutorial. So I decided to make one.

This first part covers the basics for making USB-powered devices, and serves as introduction for second part, which goes through simple example for using V-USB library to implement USB communication to and from ATtiny2313. Additional parts might be published later if I have the time and there’s interest.

But let’s get started. Here is what you need for this first part:

  • USB cable and pin header
  • Small breadboard and a few jump wires
  • LED and 330 ohm resistor
  • Low voltage drop 3.3V regulator, such as LD1086V33 or LE33CZ

The cable

The first thing we need to do is cut the USB cable so the end that goes into computer remains, strip the other end and solder the four wires into a pin header so it’s easy to plug the cable into a breadboard. USB contains four wires which you should solder in the following order (note: not all cables conform to this so check with a multimeter!):

Pin Color Function
1 Red VCC (+5V)
2 White D-
3 Green D+
4 Black Ground (0V)

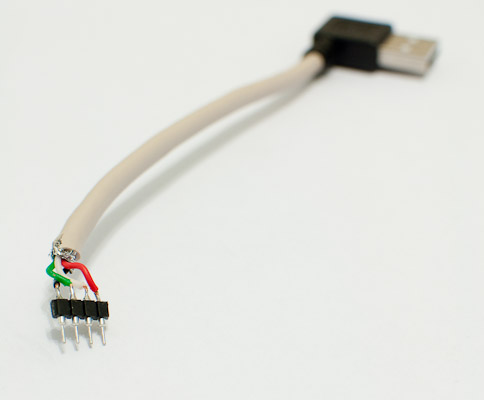
Here you see the end result. When stripping the wire, be careful not to damage the wires and make sure the wires will not touch each other so your cable won’t short circuit your computer or USB hub!

Cable with soldered pin header

If you want to know more about USB connectors and electrical characteristics, I warmly recommend USB in a NutShell by Beyond Logic, and of course the USB 2.0 specification. For now, it’s enough to understand that USB bus can provide small amounts of current (couple hundred milliamperes at most) at roughly 5V.

Simple breadboard test

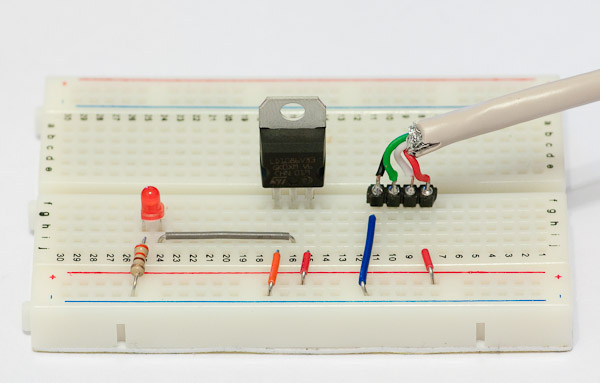
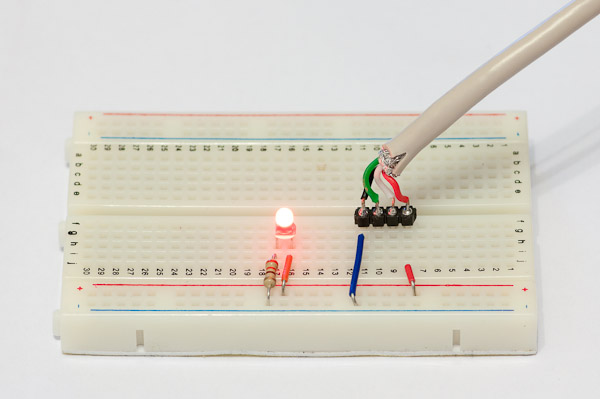
Now let’s try if we succeeded in our soldering project. I recommend you first connect your cable to USB hub and use a multimeter to measure if you actually have 5V between VCC (red) and GND (black). I myself got 5.18V. Then plug the pin header into breadboard and use jumper wires to transfer VCC and GND to power rails, and connect a LED in series with the resistor to see if you get it lit!

LED lit using USB power

Congratulations! If all you want is power from USB, you can now proceed to build any 5V circuit as long as the current draw remains rather small. In case the LED stays dark, check that you did not make a mistake with the wires, soldering or insert the LED the wrong way. :)

Preparing for USB communication – getting to 3.3V

While USB power is 5V, the data lines require 3.3. Some computers tolerate 5V logic but not all. To play by the book, you have three options:

  1. Limit the voltage provided by USB to 3.3V
  2. Power the circuit externally from 3.3V
  3. Use resistors, diodes or zener diodes to convert 5V logic to 3.3V

We will choose the first option here. The second can be achieved using your favorite method, such as 9V battery and a regulator, cell phone charger with suitable voltage setting, or 3 AAs and one or two protection diodes that drop the voltage. For third one, you can find many articles from the web by googling “zener diode usb” (Update: You can also take a look at “Part 6” of my tutorial which covers this). V-USB wiki has a good overview of the options:

http://vusb.wikidot.com/hardware

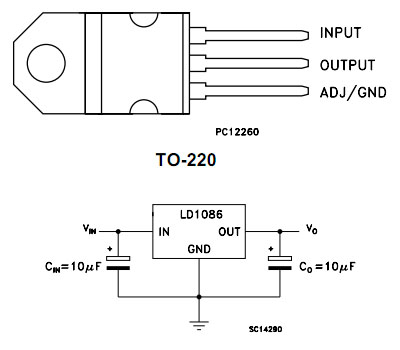
In this tutorial, I’m using LD1086V33. From the datasheet, we can see that pin 1 of regulator is ground, pin 2 output and pin 3 input. Furthermore, 10 uF capacitors are specified between ground and output, as well as between ground and input.

Pin ordering and example circuit

Here I have connected the regulator’s ground and and input pins to power rail supplying 5V and the output pin into LED and resistor.

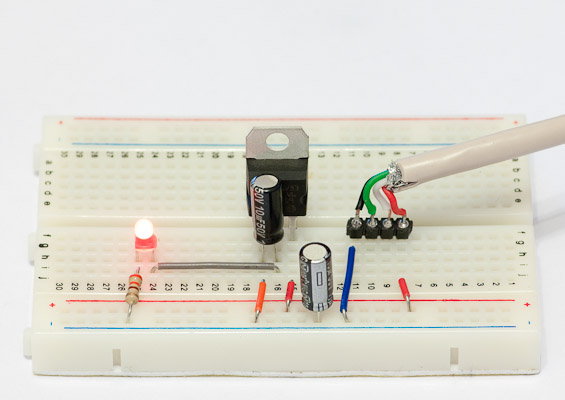
While this circuit will likely work, any small glitches in power draw or supply require the regulator to compensate, and this can lead to a continuously oscillating voltage. So we add the 10 uF capacitors between 5V and ground (added here to power rail) and 3.3V and ground (added in front of the regulator). Be sure to connect electrolytic capacitors the right way (minus side is marked). And voila!

Now we are ready to power our AVR circuit or whatever project using a nice 3.3V voltage. Use a multimeter to check that voltage between ground and regulator input is still indeed about 5V, and the regulator output and ground is 3.3 (I got a nice 3.30V myself).
Proceed to the next part of this tutorial

39 comments

Kerrash:

Awesome stuff, just worked through this; I would love to see more tutorials like this.

FredG:

Sadly, not all USB cables are built to the standard. Just bought a really cheap cable from the discount store for a USB-AVR project and found that the third-world factory had wired the cable with black and red reversed. Maybe a color-blind worker? Just to keep me on my toes, the white and green wires were blue and white, and they were in the right place (if you reckon blue is the new green)

Pays to check every step…

jokkebk:

@FredG
Heh, I was wondering how many cables get it “right” and how many do not when I wrote the part on wire colors. Seems like a word of caution in that part may be in place. :)

Tom:

Nice tutorial, thanks a lot. Just a question – wouldn’t it be safer to put some resistor in series with the input-side capacitor to limit the current? For a short time after connecting, when the capacitor is fully discharged, there is a short cicuit between USB VCC +5V and GND and thus the current could exceed the USB specs. I beleive it won’t be an issue in most cases, though.

jokkebk:

@Tom
Yes that would probably be safest. However, I’m not sure but it might actually be that USB spec defines that the port should limit the current (in the case of short circuit etc.) – at least I recall being concerned that I might burn a USB port by drawing too much power, but then reading about it a bit more and realizing that should not happen.

John:

Would it work with an Atmega48 (it’s able to run at 3.3V)? My local electronics story doesn’t have Attinys and it would be much more expensive to get an Attiny online.

jokkebk:

@John: I’m quite certain that it would, as long as it’ll run with 12 MHz clock (or any other frequency supported by V-USB), which the ATmega48 seems to support.

David Lee:

I read it well. I have a question, I tried to control USB Port by using 5V Power, for example, if i put the DPDT Switch for controlling 1 (red line) and 4 (black line) , is it o.k to operate the USB Port ?
Because, USB connected only 2(D-, white),3(D+, green) without 1,4, it will not be reconized from PC.
Is it wrong my guessing ?

jokkebk:

Hmm, what do you mean “control USB port by using 5V power”? If you mean that you are driving data lines D+ and D- from a 5V MCU without any level shifting, that will not work on all computers (and might even damage some, although that is quite unlikely), so I’d recommend a zener configuration.

If you mean controlling the USB port while using 5V external power supply, then you’d only need to connect the grounds (black wire) so the logic levels have a common reference point – just make sure that your power supply ground is not significantly on a different level than USB ground (with my switching power supplies, there’s a few millivolts when I measure it with a multimeter, but I don’t think that will cause much current to flow over the ground line, it’ll quickly level once grounds are connected).

If the device is not recognized when VCC (red wire) is not connected to anywhere, you might want to add a 10k-20k resistor between it and ground – the FT232RL datasheet has excellent “reference implementations” for USB circuits using external power, USB power, switchable power etc. so you might want to check that:

http://www.ftdichip.com/Support/Documents/DataSheets/ICs/DS_FT232R.pdf

Just don’t use a DPDT switch that shorts VCC and GND, it could fry your USB hub!

Finally, if you meant you want to use the switch to turn your device on and off, then a DPDT switch would work just fine, connecting red and black wires to your project circuit when switched on. :)

Meurig:

The V-USB wiki mentions that using low-drop regulators “imposes additional supply current (quiescent current) that violates the 500 µA limit for USB standby”.

From my reading of the datasheet for the LD1086V33 used above, the quiescent current is typically 5mA, much more than the 500 µA from the wiki.

Am I reading the datasheet wrong? Does the wiki have it’s figures wrong? or is the USB standby current a technical violation of the spec that usually doesn’t matter in practice?

I think I’ve found my own answer here: http://www.beyondlogic.org/usbnutshell/usb2.shtml

“…most hosts and hubs don’t have the ability to detect such an overload of this magnitude and thus if you drain maybe 5mA or even 10mA you should still be fine, bearing in mind that at the end of the day, your device violates the USB specification. “

jokkebk:

Yes, the device built here definitely would not pass the USB compliance tests. However, even our MCU will consume more than 500 uA because we’re not handling any “go to standby” signals that might be sent by the USB host. So even discarding the low-drop regulator or using some method to put that to sleep mode, we wouldn’t be any closer to USB compliance – therefore I haven’t bothered too much with that fact. If one would like to build a fully USB compliant device (i.e. get the sticker and everything), the regulator will be simplest of the worries. :)

So I wouldn’t worry about the regulator while our device is so “stupid” it ignores any sleep and standby signals, and probably it doesn’t handle wakeup events any more gracefully. And as you said, it’s unlikely that any USB host would be electronically designed so that going to sleep mode would switch to another current source that could break with the non-standard energy consumption of our device – most likely it’ll work, and in worst case our device would just not receive enough current to do its job.

Mia:

The USB power in my laptop is 6V. What should I do?help

jokkebk:

If you have a low-drop regulator (doesn’t even need to be that low if you have 6V instead of 5V) like the one suggested in this tutorial, it should be no problem.

Powering an ATtiny directly may also work, but there’s a small chance your microcontroller doesn’t like it.

Also, you can decrease the voltage using a simple diode (e.g. 1N2222) – normal ones usually drop the voltage about 0.7V. So instead of just wiring the 6V to your circuit, run it via a diode.

Harpreet Singh:

Help me out in my project

jokkebk:

Could you elaborate somewhat? :)

ali khanjani:

how can i connect my photo camera to my avr than take photo and at that time transfer my photo to my computer
?

jokkebk:

I’m afraid that is completely out of scope of this tutorial. I suggest you try some electronics forums. You’ll need to decide what type of camera (USB webcam, somthing with a interface that MCU can easily talk to, etc.) you’ll use, and then will you do a custom software to transfer the image (in which case you can use USB, RS-232, or many other interfaces), or if you’d like something more plug and play.

Also, if you have only the requirements you mentioned, a webcam connected to PC would be enough, too.

beantree:

Hi.
The Atmel data sheet seems to suggest that the ATTiny2313 isn’t specced to run at 12MHz when Vcc is 3.3v?
Speed Grades
– ATtiny2313V: 0 – 4 MHz @ 1.8 – 5.5V, 0 – 10 MHz @ 2.7 – 5.5V
– ATtiny2313: 0 – 10 MHz @ 2.7 – 5.5V, 0 – 20 MHz @ 4.5 – 5.5V
Am I reading this right?

jokkebk:

Cool, didn’t notice that. In practice, it does work very well – which isn’t all that surprising if you consider that 10 MHz should work without problems at 2.7V. Maybe I wouldn’t start mass production with those specs, though. :)

Joanna:

Hmm is anyone else experiencing problems with the pictures on
this blog loading? I’m trying to figure out if its a problem on my end or if it’s the blog.
Any suggestions would be greatly appreciated.

jokkebk:

At least from Finland they seem to work fine. If you have specific images missing, report the URLs and I can check that I have not accidentally removed them in WordPress or anything.

kapil:

Hello, Very simple and descriptive tutorial. Thank you for this nice tutorial. how can I give the command to device like (1,200) where 1 is the ID and 200 is the specific code. Any simple example ?
regard

jokkebk:

You have the wValue and wIndex -parameters in usbFunctionSetup, later parts of the tutorial show how those are accessed (e.g. rq->wValue.bytes[0]) and set on the PC (usbtest.c) side.

PS. And yes you probably could simulate the LED example in this part in Proteus if it contains a regulator component (or you build it yourself). Wouldn’t be of much use though (“LED lights” :).

canibalimao:

I don’t have here with me 10uF capacitors. I can use any other capacitor values, or the value should be arround 10uF?

jokkebk:

The regulator might just work without any, but some may start fluctuating and heat up while attempting to keep voltage regular, so capacitors would probably be a safe idea. Anything between 1 uF and 100 uF will probably work OK, even 0.1 uF may help some.

You can think the capacitor as a reservoir – on supply side it provides quick current for regulator in case your voltage supply is momentarily dipping a bit, and on the regulated side it keeps current spikes consumed by microcontroller or any other part of your project out of sight of the regulator. The smaller reservoirs you have, the more directly the regulator “sees” the spikes in demand and supply, and may struggle to compensate for changes (or overcompensate / start to fluctuate). The manufacturer recommended values are usually the best – too small capacitor and you have limited balancing, too big and the capacitor may eat up too much current when loading up.

However, from personal experience things have worked fine in small projects that don’t tax the regulator too much even with smaller caps, or no caps at all (although I haven’t used an oscilloscope to see how bad the regulation becomes).

canibalimao:

Thank you very much for the lesson jokkebk :D

I have here at home a bounch of 470uF capacitors that I’d bought to another project and I want to know if I need another one or I could use those.
That way I’ll buy a smaller one when I went to the electronics store.

Krishna:

Hello,
Is it posssible to use this method on an AT89C51 controller. I know it’s an outdated one and based on 8051 architecture not AVR, but its easy to fetch the old ones from local electronics store.

jokkebk:

Highly unlikely – if the instruction set is different, I’m quite sure the V-USB assembly inner loop timings will be different (and probably non-working) and will not results in proper USB signalling. You’ll probably need to order some more modern chips by mail. :-d

student12345:

Could you just make a voltage divider to get down to 3.3 for that data lines instead of using zener diodes?

Joonas Pihlajamaa:

Don’t know if it would draw more power or have some other drawbacks. For some reason zeners seem the most common suggested option, haven’t done the research why that is – might be that because the lines are used also for input, voltage divider doesn’t work as well in that direction – it would lower the 3.3V logic high below AVR treshold of 1.

John:

Actually, it wouldn’t lower the voltage at all, assuming the input resistence of the INT1..0 pins is sufficiently higher than the resistor that would be between the port and the data line. Essentially, the divider would be set up like this:

INT1 --vvv--o--- Data
R1 |

|
GND

This would mean that the voltage across R1 and the high input impedance towards GND would be the same as across R2:
3.3V on incoming signal, 3.3V on outgoing.

Or am I missing something?

John:

Wow, my ASCII drawing messed up badly. R1 runs from INT1/0 to the data line in question, R2 from the data line to GND.

John:

nvm. That probably messes up the early communication about High- vs. LowSpeed usb device.

ben:

What are your thoughts on the LUFA/MyUSB stack, or the Microchip USB stack (which I think is open source now)?

What challenges do you see porting this code to a design with a ATmega128 instead of an Attiny?

Joonas Pihlajamaa:

Haven’t used LUFA or other stacks that rely on hardware USB support, probably they are simpler as there’s less code in firmware side and the device can probably do many things independently without wasting main MCU cycles.

ATmega128 is probably a piece of cake, just change the pins.

HabbaTheJut:

Can you do the one where you step down 5v to 3.3v using just a resistor? Or is it the same thing?

Joonas Pihlajamaa:

If you use a resistor to drop voltage I recall a proportional amount of heat is generated in the resistor. For example if your circuit uses 50 mA at 3.3V and you drop 1.7V with resistor, you’ll have 50*1.7 = 90 mW heat production at resistor. A small one might get pretty hot. :)

ayush:

i want to make a USB to TTL converter module. can anyone plz tell me if ATTINY 2313V cud b used for the purpose n how? or any other simpler way.

Aapo Saaristo:

I know this post is ooooooold, but a bunch of sites link to it as it’s very clearly written and explains things well, so it might be pertinent to mention, that Objective Development warns about using general-purpose LDOs, and specifically mentions the LE33CZ recommended in this post, as their power-usage is often (relatively) high, which in combination with the pull-up on the bus is viable to cause issues with USBs quiescent current draw limit of 500 micro-amps during suspend mode. In practice, this is unlikely to cause issues, but it’s worth noting, since behavior in out of spec situations like that is unpredictable.
The LE33CZ has, at zero output current, a typical quiescent current draw of 0.5mA or 500µA. Together with the 200µA from the D- lines pull-up puts it way past the limit before *any* draw from the MCU.
More expensive low-power LDOs, like the ones in TI’s TPS715 line, OTOH have typical current consumptions of 3-5µA, leaving much more breathing room for the MCU from the 500µA limit, even with the pull-up.
This is one reason why a lot of people opt instead to go the route of using two rectifier diodes in series on the MCUs supply line, because even though the voltage will be unregulated, and the MCU might be overclocked slightly out of spec, in practice (if you don’t need to do analog shenanigans which would need voltage regulation) AVR chips will champion on slightly overclocked and everything will be (mostly) in spec on the USB side.