BeagleBone Black GPIO Benchmark
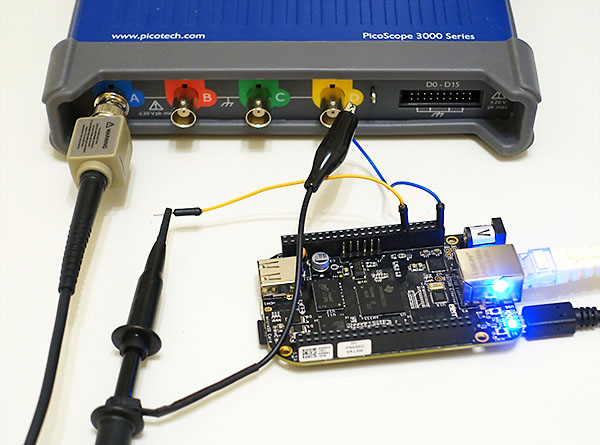
Look what the mailman brought: It’s a shiny (or maybe matte?) BeagleBone Black, freshly arrived (actually it’s been over a month, but time sure flies…) from Newark element14! I’ve been doing Raspberry Pi related hacking for a while, but especially when the Pi was still fresh and new, I did from time to time consider if the grass would be greener on other side of the fence. Or blacker, in this case, as I mean BeagleBone Black.
BeagleBone was long very much more powerful than Raspberry Pi, but now that Pi2 has come out, price and specification-wise they are closer than ever. A quick personal comparison chart:
| BeagleBone Black | Raspberry Pi 2 (B) | |
|---|---|---|
| Price | 46 € (Element14) | 32 € (Element14) |
| Processor | 1GHz single-core Cortex-A8 | 0.9GHz quad-core Cortex-A7 |
| Memory | 512MB DDR3 | 1GB |
| Connections | USB host, USB device, micro-HDMI | 4x USB, HDMI, 3.5mm Audio/analog video |
| GPIO | 2x 46 pin headers (65 digital I/O) | 40 GPIO pins (26 digital I/O) |
| Other | 4GB integrated flash, works as USB device | camera and display interface on board |
When Pi1 was out, the BeagleBone Black with the more modern Cortex-A8 chip and higher clockrate was definitely the more powerful, but now with 4-core Pi2, the tables have somewhat turned. Still, the clockrate is higher and there’s more GPIO. And speaking of GPIO, my Raspberry Pi vs. Pi2 GPIO benchmark has gotten a lot of interest, so I thought the best way to take this black beauty for a test drive would be to benchmark BeagleBone Black GPIO in a similar way.
Test setup
The test subject is the most recent revision C of BeagleBone Black. I followed the (a bit lacking in detail and readability) Getting Started guide and downloaded the latest Debian Jessie image (8.3, 2016-01-24), flashed it to card and ran apt-get update and apt-get dist-upgrade (2016-04-14).
While flashing, I realized my main partition on the microSD was still only 4 GB, but thankfully the upgrade had just enough space to finish. I suggest expanding your partition before upgrade. Unlike Raspberry Pi, the BeagleBone does not ask upon first boot to resize the partition (or due to headless setup I missed this).
Results summary
Below you can see a summary of the GPIO benchmark results. Read on below to see the actual code used and measured waveforms when applicable. If you have a platform you’d like me to cover, you can make requests at the comments section, I’ll try my best to accomodate!
The test is a basic “toggle one GPIO pin as fast as possible”. It does not measure multiple pin performance, input performance or the capabilities of built-in hardware capabilities like I2C communications or PWM which might operate on significantly higher speeds. It basically tells that with benchmark speed of 1 kHz, you can expect 2000 toggles per second on that programming language, or on average 0.5 ms for a single toggle.
The test doesn’t measure variance either, similarly to the Raspberry Pi benchmark, the underlying Linux operating system can (and will) interrupt the benchmark program to do other things, and the GPIO will “hang” during this time. Linux is not a real-time operating system, so any applications that require exact timings will need to be handed over to a microcontroller board like Arduino, or alternatively use the hardware I2C, UART, etc. capabilities of the BeagleBone Black.
| Language / Library | Version tested | Date | Speed |
|---|---|---|---|
| Python / Adafruit BBIO | 0.0.30-py2.7-linux-armv7l | 2016-04-14 | 5.5 kHz |
| Shell / file-based GPIO | N/A | 2016-04-14 | 3.5 kHz |
| C++ / file-based GPIO | Derek Molloy’s latest github code | 2016-04-14 | 5.3 kHz |
| C / memory-mapped GPIO | Chirag Nagpal’s latest github code | 2016-04-14 | 2.9 MHz |
Python
Unline Raspberry Pi, BeagleBone Black has no single wiki page where you can find different programming language examples of GPIO use. Thankfully, Adafruit has great tutorials for the BeagleBone, so we’ll start with adapting the Python LED blink example. Code is quite straightforward:
import Adafruit_BBIO.GPIO as GPIO
import time

GPIO.setup("P8_10", GPIO.OUT)

while True:
    GPIO.output("P8_10", GPIO.HIGH)
    GPIO.output("P8_10", GPIO.LOW)
Measuring the frequency with Picoscope, we get a decent 5.5 kHz square wave. However, on grander scale of things, we can see there are quite long gaps of about 10 milliseconds between some of the transitions:
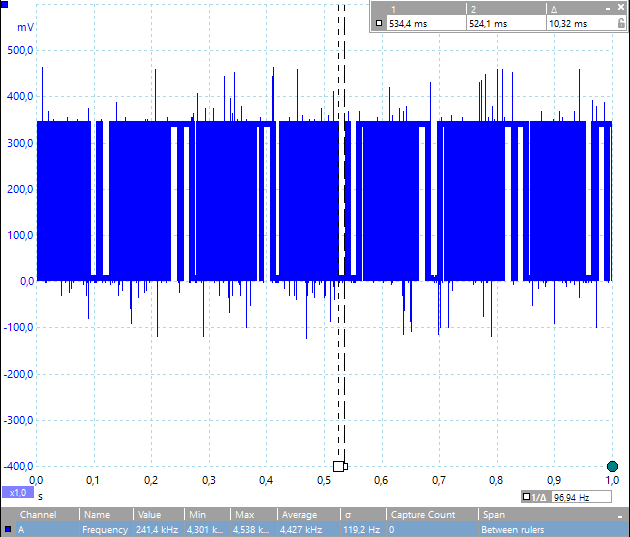
This is probably due to single core ARM CPU that needs to handle network traffic and other kernel housekeeping tasks every now and then.
Shell with overlays
Did I already say GPIO programming seems more of a chore on BeagleBone than on RaspPi? Well, I stumbled to multiple mentions of “capes”, “cape manager” and such, and as a result of some kernel changes, and me using kernel 4.1 that came with Debian Jessie, it took a while to realize the “bonemanager” directory had moved to a new place. After this, I was able to use Derek Molloy’s very helpful, but still quite complex 45 minute video tutorial and related shell commands to install his demo overlay that claims P9 expansion slot pin 12 (that is the 6th inner pin from 5V power connector downwards), i.e. “GPIO 60” alias “pin 30” a.k.a. “GPIO1_28” that is the pin on address 0x878, meaning offset 0x78 as it’s own so it can be used safely as an output. Beat that Arduino — you only have 3 numbering schemes for a pin! I still have no idea if the code below would’ve worked just fine without following the tutorial or not… Here are the main commands needed for compiling and loading the overlay:
git clone git://github.com/derekmolloy/boneDeviceTree.git
cd boneDeviceTree/overlay
./build
cp DM-GPIO-Test-00A0.dtbo /lib/firmware
echo DM-GPIO-Test > /sys/devices/platform/bone_capemgr/slots
cat /sys/devices/platform/bone_capemgr/slots
After that, I was confident enough to fiddle with the port 60 to my heart’s content, which enabled me to almost copy-paste the shell code from RaspPi benchmark — this is also very similar to this tutorial:
#!/bin/sh
echo "60" > /sys/class/gpio/export
echo "out" > /sys/class/gpio/gpio60/direction
while true
do
echo 1 > /sys/class/gpio/gpio60/value
echo 0 > /sys/class/gpio/gpio60/value
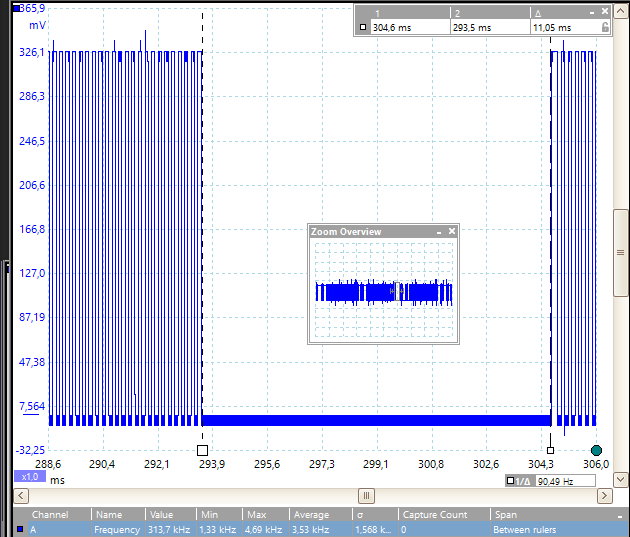
doneThe results are not too great, roughly 3.5 kHz square wave with similar 10 ms gaps every now and then:
C++ with file system access
Once the weird cape overlay thingy was installed, I was able to modify Derek’s LED blinking code to make a faster-than-shell version of the above method:
#include "SimpleGPIO.h"
using namespace std;
unsigned int LEDGPIO = 60; // GPIO1_28 = (1x32) + 28 = 60
int main(int argc, char *argv[]){
gpio_export(LEDGPIO);
gpio_set_dir(LEDGPIO, OUTPUT_PIN); // The LED is an output
// Strobe the P9_12 a few times
for(int i=0; i<100000; i++) {
gpio_set_value(LEDGPIO, HIGH);
gpio_set_value(LEDGPIO, LOW);
}
gpio_unexport(LEDGPIO); // unexport the LED
return 0;
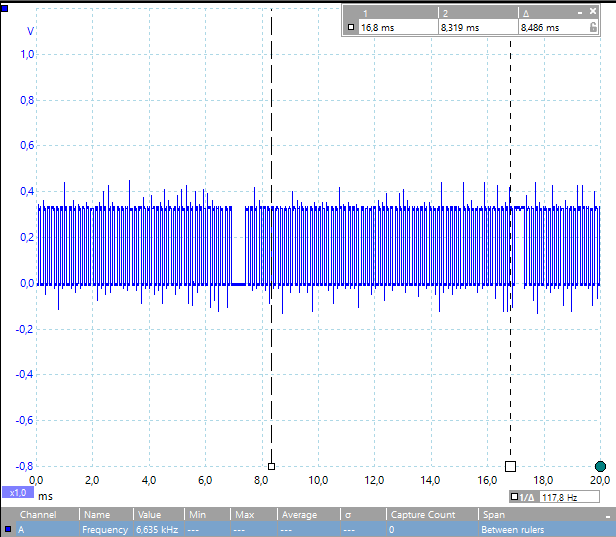
}The result is faster than the shell, but only a bit: 5.3 kHz on average. The screenshot below has a zoomed in view to waveform which shows slightly better result (6 kHz):
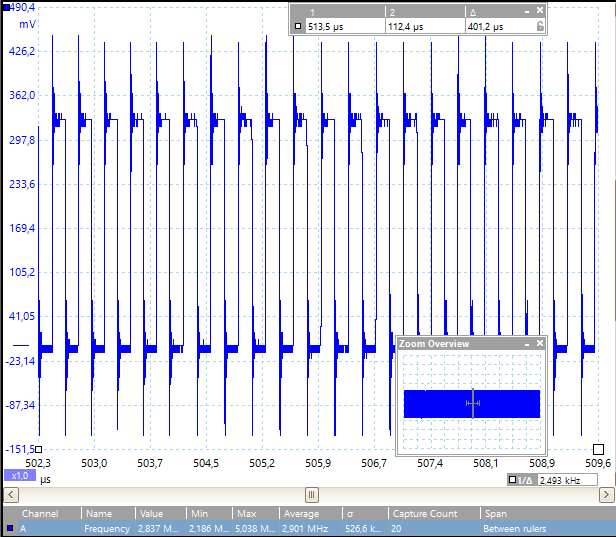
Memory-mapped GPIO with C
Obviously you can only go so far through the filesystem. Unfortunately, more direct access also means more code. Thankfully, Chirag Nagpal had already solved this recently and made his code available on github. Chirag had found out, that in order for the memory-mapping to work, you need an overlay to reserve the GPIO pin to be used. Luckily (or not completely as he already read Derek’s tutorial) he’d decided to use the P9_12 pin I had already figured out to overlay properly, so things went quite smoothly:
echo DM-GPIO-Test > $SLOTS
git clone https://github.com/chiragnagpal/beaglebone_mmap
cd beaglebone_mmap
gcc gpi.c
./a.out
After running, I was greeted by blisteringly fast toggling signal — 2.9 MHz on average, which is about thousand-fold increase, just like Chirag had experienced:
Conclusions
Based on the GPIO tests I’ve carried out today and what I’ve learned along the way, I think one can draw four conclusions regarding BeagleBone Black GPIO access and performance:
- Adafruit’s GPIO library is an easy and average performance candidate of manipulating the GPIO, and definitely speedy enough for any LED toggling or motor driving activities needed
- Single core processor introduces 10 ms delays to GPIO toggling, so any communications need to be done with hardware UART, I2C, etc. methods, which thankfully exist on the BeagleBone as well
- The “overlay” system introduced in recent kernels has increased the access curve for advanced GPIO access beyond what most beginners can do. It took me half a day, and I have two decades of programming and Linux experience.
- Only the memory-mapped C access can be considered fast, and even that falls short of Raspberry Pi’s 20+ MHz speed. So against the Pi, BeagleBone’s strengths is mainly the adaptability of the cape system (I haven’t checked if the Pi has had similar developments along with kernel upgrades, though
Thanks for reading! I’ve now covered Raspberry 1, Raspberry 2 and BeagleBone Black in these GPIO benchmarks. Perhaps it would be time to get a Raspberry Pi 3 to test drive next? :D